I’ve had a few requests from visitors to my old (and now defunct) electrons site for the AVR Makefile. Originally created in 2003, and finally included in the resources for an AVR-related Linux Journal article back in 2005, it turns out it’s still pretty useful so I’m replicating the original Makefile and instructions here, with a few modernizations.
Note that I haven’t gone over the writing, so you get to have a taste of my younger self’s style–please be forgiving ;-)
If For Arduino…
This makefile was designed for the Atmel (now Microchip) AVR family (mega, xmega, tiny… whatever avr-gcc can handle). If you are specifically looking to compile code for Arduino, you’re way better off using an Arduino Makefile. I’ve used that system, and it works quite nicely.
AVR Project Organization: Standardized AVR Makefile Template
This document details the customization and use of our Makefile template to manage, build, debug and upload your AVR projects.
TOC
Managing Complexity
When you begin to create complex software projects, whether for the AVR microcontrollers or any other platform, it quickly becomes useful to split the code into multiple files. Just as a number of small and simple functions are easier to comprehend and maintain than a single monolithic monstrosity,
having your project split into logical blocks (grouping related functions, or classes with C++, in separate files) will help you keep a good handle on your project.
But even with the simplest “Hello World” program, the steps required to build, debug and prepare your code for installation on your target microcontroller can become tiresome–and the problem is only compounded when you start multiplying the number of files involved.
The Makefile
A solution we’ve found simple and effective is to get someone else to handle all the details for us: in this case, GNU Make.
To do so, we’ve prepared a Makefile template that is easy to customize and makes building and installing your C (or assembly) projects a snap. You can
download the Makefile template.
The Makefile only requires two adjustments to work with your own projects:
#####         Target Specific Details          #####
#####     Customize these for your project     #####

# Name of target controller
# (e.g. 'at90s8515', or 'atmega328p' for the '328 used
# by basic Arduino... see the available avr-gcc mmcu
# options for possible values)
MCU=atmega328p

# Name of our project
# (use a single word, e.g. 'myproject')
PROJECT=myproject
- Setting the MCU specifies the AVR for which you wish to compile your program. Each AVR has its own particular set of quirks and setting the -mmcu options to this MCU allows avr-gcc to deal with many of those particularities for us. Valid values for MCU will depend on the version of avr-gcc you are using, so check its info page.
- The PROJECT value is totally up to you. It determines the name of your compiled executable and other files. Set it to a single word (no whitespaces or weird characters).
- For compilation, the final value you may set is the PRJSRC. The way the Makefile is now setup, it’ll scan for C (.c), C++ (.cpp or .cc) and assembly (.S) files in and under the directory where you’re running make. These will be compiled and linked together when creating the executable. But you can override this and specify the list of files manually if you prefer.
Additional configuration parameters will allow you to specify additional include paths (INC) and libraries (LIBS), optimization level (OPTLEVEL)
and hardware programmer settings (AVRDUDE*).
Make targets
Once you’ve customized the Makefile template for your project, it’s time to build stuff!
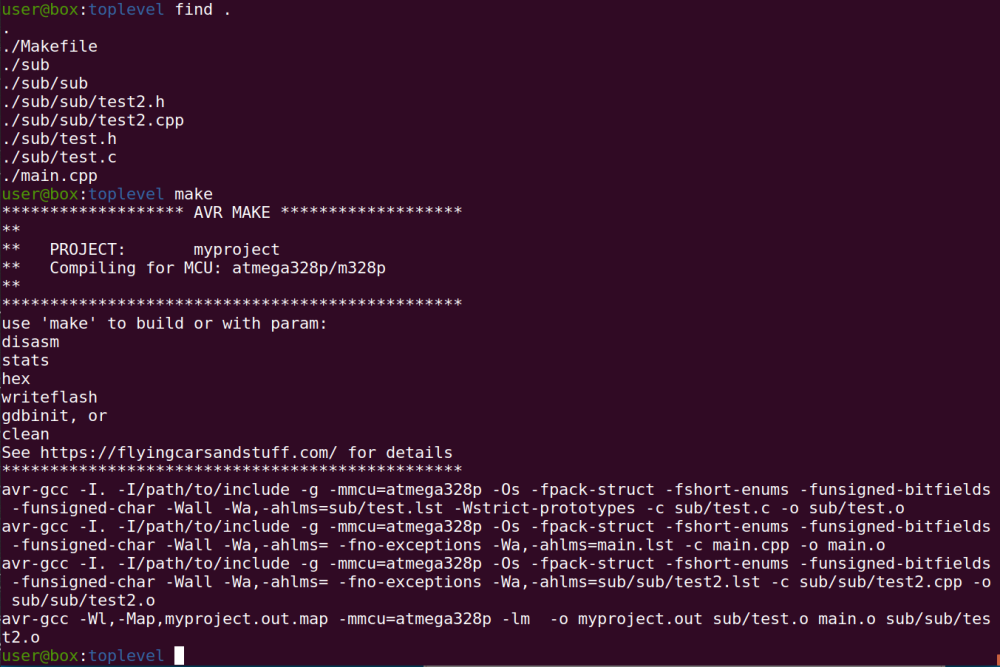
Below, we shall assume you’ve selected the outrageously original name ‘myproject‘ for your project and renamed your custom version of the makefile to Makefile (without the .tpl extension). There are a few default targets you can choose from, when calling make. They are:
make
Typing
$ make
or make all will build your project, compiling all the C, C++ and assembly source files you specified, linking them into an ELF executable called
myproject.out. Although myproject.out looks and smells like an executable, attempting to run the program will likely get result in a message of the form:
$ ./myproject.out
bash: ./myproject.out: cannot execute binary file
So what use is this file? One interesting possibility is to use a simulator and avr-gdb to debug the program as it runs.
make hex
If you are ready to upload your program to an AVR chip, you can
$ make hex
Doing so will create two files, myproject.hex and myproject.ee.hex, based on the ELF .out file produced when building the project. The myproject.hex
file is the program data from your compiled executable, in Intel Hex format (set with the HEXFORMAT variable in the Makefile), ready to be uploaded to the AVRs flash program memory.
The myproject.ee.hex is the data to be written to the AVRs eeprom–in many cases your projects won’t use this but the file will be created nonetheless, with the “empty” value of :00000001FF within.
How exactly you go about programming the actual chip will depend on your setup, both hardware and software.
If you have a programmer that works with AVRDUDE, have installed the avrdude program and configured the Makefile, you can use the
writeflash target and make writeflash, to write your program to the chip’s flash memory.
You may also choose to perform the action manually.
If, for example, you were using an ISP mark II programmer with avrdude, to burn an xmega128a4u chip, the command
$ avrdude -c avrispmkII -p x128a4u \
          -P usb -U flash:w:myproject.hex
would allow you to upload the program the chip’s flash.
make disasm
The disasm target provides information of the compiled executable and allows you to take a close look at exactly how your code is being compiled, which can be very important on a tight platform such as the AVR microcontrollers.
Issuing the command
$ make disasm
will compile and link myproject.out, if necessary, provide information on the object file’s section headers (text, data, bss…) using avr-objdump and use avr-size to output information on the program’s compiled size, e.g.
myproject.out:     file format elf32-avr

Sections:
Idx Name          Size      VMA       LMA       File off  Algn
  0 .text         00000294  00000000  00000000  00000094  2**0
                  CONTENTS, ALLOC, LOAD, READONLY, CODE
  1 .data         00000000  00800060  00000294  00000328  2**0
                  CONTENTS, ALLOC, LOAD, DATA
  2 .bss          00000007  00800060  00800060  00000328  2**0
                  ALLOC
  3 .noinit       00000000  00800067  00800067  00000328  2**0
                  CONTENTS
  4 .eeprom       00000000  00810000  00810000  00000328  2**0
                  CONTENTS
  5 .stab         00000d80  00000000  00000000  00000328  2**2
                  CONTENTS, READONLY, DEBUGGING
  6 .stabstr      0000084f  00000000  00000000  000010a8  2**0
                  CONTENTS, READONLY, DEBUGGING

avr-size myproject.out
   text    data     bss     dec     hex filename
    660       0       7     667     29b myproject.out
Even if you aren’t too interested in the above information, the disasm target is useful for another reason: the generated myproject.s file.
Along with the above, the build process will create this .s file, which provides blow by blow coverage of the compilation process.
Viewing the myproject.s file, you will see the C/C++ code of your program as it was translated to assembly.
This can be very useful when trying to gain an understanding of the system or attempting to optimize performance and can be a great way to get familiar with the AVR assembly language.
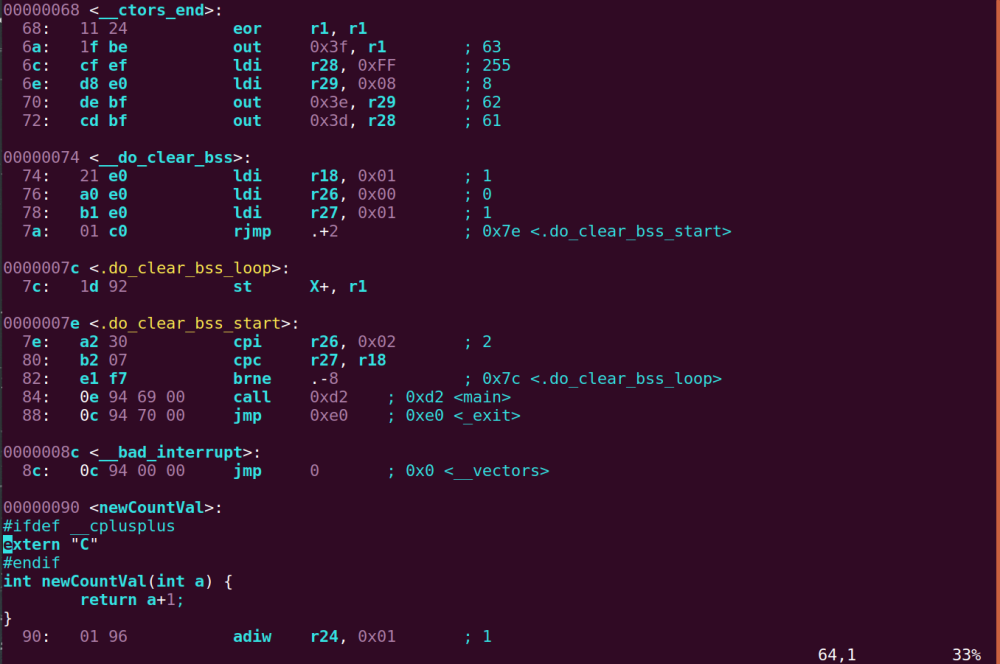
Here is a short snippet, taken from a random function in a .s file:
        outp(MYTIMERSTARTLOW, TCNT1L);
 136:   1c bc           out     0x2c, r1        ; 44
        outp(MYTIMERSTARTHIGH, TCNT1H);
 138:   1d bc           out     0x2d, r1        ; 45
        ++overflowCount;
 13a:   30 91 60 00     lds     r19, 0x0060
 13e:   3f 5f           subi    r19, 0xFF       ; 255
 140:   30 93 60 00     sts     0x0060, r19

        if (overflowCount >= secondScaler)
 144:   20 91 63 00     lds     r18, 0x0063
 148:   32 17           cp      r19, r18
 14a:   08 f4           brcc    .+2             ; 0x14e
 14c:   4b c0           rjmp    .+150           ; 0x1e4
        {
                unsigned char newValue;
                overflowCount = 0;
 14e:   10 92 60 00     sts     0x0060, r1
                if (skipnext)
 152:   20 91 61 00     lds     r18, 0x0061
 156:   22 23           and     r18, r18
 158:   89 f0           breq    .+34            ; 0x17c
                {
You can see that it is mainly assembly instructions, interspersed with C.
Each assembly line is numbered (hexadecimal:) and includes the instruction in machine language (e.g. 4b c0) and the corresponding assembly (rjmp .+150).
You will notice that assembly comments are also often included (after the semicolon, ;). These are context dependent;
they will usually be the decimal “translation” of a hex value used in the instruction (e.g. 0xFF ;255) or the absolute line address when a relative value is used, so you can jump to the line without spending your time counting instruction bytes
(e.g. rjmp .+150 ; 0x1e4 means to jump to line marked 0x1e4).
Even without using make disasm, it is possible to glean a good deal of information using the .lst files produced during compilation.
make *.s
If your project is comprised of multiple files and you wish to examine the assembly output for a single specific source file, you can use the Makefile to have it compiled while indicating that the compiler should halt before creating the object file. To do so, simply replace the filename suffix (e.g. “.c”) with “.s”.
For instance, to produce assembly for myfile.c, you would enter
$ make myfile.s
All the .s files thus generated will be removed by make clean (this is why you must name any assembly files you create using a capital .S).
make writeflash
If you’ve installed the avrdude programmer software and correctly configured the AVRDUDE_PROGRAMMERID and AVRDUDE_PORT variables
in the Makefile, you can use
$ make writeflash
or
$ make install
to write the hex program to the microcontroller. Be sure:
- to double check your AVRDUDE* configuration parameters in the Makefile
- that your programmer hardware is connected properly and powered up
- that you’ve got the right MCU in the programmer, securely and correctly placed, and that it does indeed
match the MCU set in the Makefile configuration
make gdbinit
If you want to simulate and debug a program using avr-gdb, there are a number of commands you need to execute each time you start up the debugger. Because repetition is tiresome and we all have better things to do, we created the make gdbinit target.
Using make gdbinit will create a text file, gdbinit-myproject, which you can use when invoking avr-gdb to perform the initial setup for use with simulavr (this includes setting the file, target and a breakpoint on main()). All you’ll need to do is invoke the debugger like so:
$ avr-gdb -x gdbinit-myproject
make clean
Using make clean will, as expected, clean up all the files created during previous builds
including the compiled program, intermediate files and others.
Notes
- If you use your own assembly files, name them with a .S suffix (capital S as in myfile.S) or they may not be recognized. In addition, .s (small s) files are
considered to have been generated by make and may be deleted by make clean. - The Makefile, in its current incarnation, only supports writing the microcontroller’s program memory. If you need to write to the EEPROM or wish to set lock or fuse bits, you’ll have to get your hands dirty on the avrdude command line.
Makefile Template
Here is the Makefile template for use in your own projects. Have fun and happy hacking.