Here we’ll go over the major aspects of Bluetooth Smart/BLE as part of the series on integrating BLE in your projects. We definitely won’t cover everything here, as there’s a lot of information to ingest if you really want to get to know Bluetooth Low Energy in and out. All that stuff can be found in the Bluetooth SIG documents, so instead I’ll try and take you along the most direct route to one solution that works well under many circumstances.
![]()
Here we’ll briefly cover:
- Low-level protocol
- Connections
- Providing services as a server
- Accessing services as a client
- The hardware module selected for the examples here and a DIY Bluetooth BLE breakout board
BLE Protocol
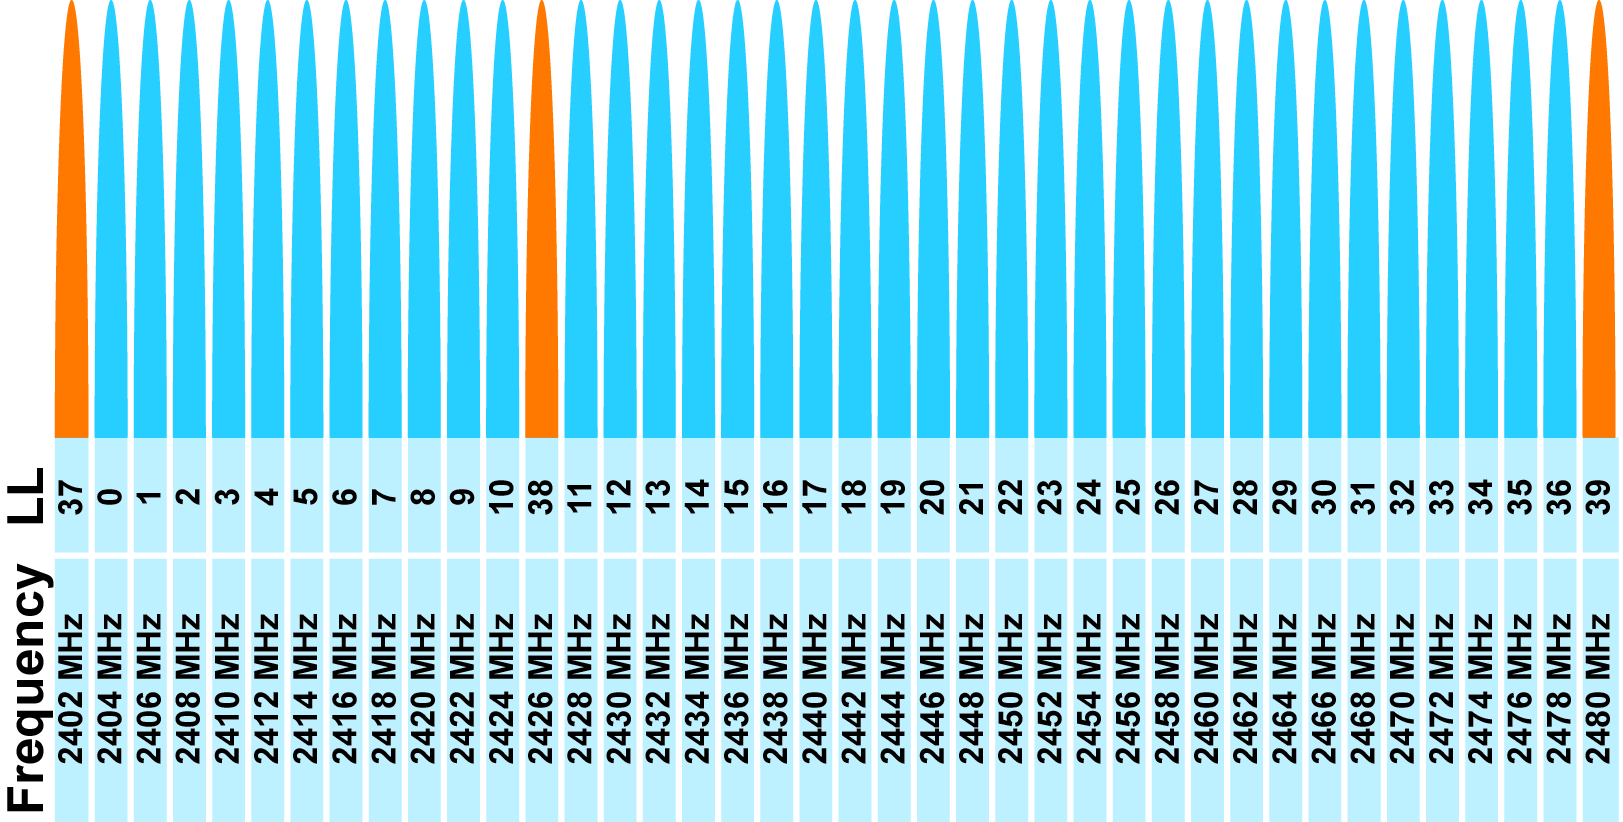 BLE devices all operate on 40 channels spread in the 2.4GHz range. Three of these channels are dedicated to advertisement, the rest are for data exchange. There’s only one general type of packet, specialized into advertisement and data types, which you pretty much don’t need to care about. Depending on the transmission power/reception sensitivity, the usable range will vary between 30 meters (a transmitter at 0.01mW and receiver with -70dBm sensitivity) and 100 meters (tx at 10mW and rx -90dBm).
Connections
Though it is possible for a BLE device to play multiple roles and change its function dynamically, most systems will probably be designed explicitly as either clients or servers of resources (masters or slaves of the connection).
A device which wants to provide information/services to remote clients will start it’s day by first becoming an advertiser. In this state, it will periodically broadcast a message to indicate it’s existence to any potential masters in the area. This advertisement is a little packet that contains the address of the slave and up to 31 bytes of extra data. This device retains the role of advertiser until someone comes along to connect.
When in the mood for contact, the eventual master gets into the character of a scanner. In this role, it listens on (one or more of) the advertisement channels for broadcasts from potential friends. When the business logic decides there’s an advertiser of interest, the scanner attempts to move into master mode by initiating a connection with the other device.
If the connection succeeds, the scanner moves into the role of master while the advertiser dedicates itself to being the slave. The master can now make any requests it feels on the slave, which will be dedicated to serving the masters needs until the connection is closed/lost. At that point, the slave is released and may begin advertising again.
Server: Providing services
If you have a device which needs to allow remote control or to return data to remote clients, you’ll be acting as a server (and probably slave).
Though there are lower layers involved and available (ATT, the attribute protocol, and L2CAP), the Generic Attribute Profile (GATT) is a very nice way to provide services and data to your clients. The GATT makes your device look a little bit like a database, or REST interface (with only read and update functionality).
When using GATT, your server will expose a number of services, which have one or more characteristics.
Each characteristic (a kind of wrapper for attribute data) is a value of a specific type (defined using a unique identifier–a UUID) with certain properties (e.g. read- or writeable). There are a number of pre-defined UUIDs, 16-bit values that everyone agrees upon to mean a certain thing (for characteristics they are listed here ). If your service wants to expose custom characteristics (something that hasn’t already be pre-defined by the Bluetooth SIG), you simply generate a unique identifer–in this case a 128 bit value–for it. You can use uuidgenerator.net or the like to do so.
How, exactly, you go about defining and setting up your GATT is device dependent. If you’re using the Bluegiga BLE112, for instance, you’d setup the GATT by creating an XML file to include in a project that would eventually be uploaded to the device’s firmware.
Here’s a sample of a Bluegiga BLE112 GATT definition that includes two standard services (generic access to identify the device, and device information to provide manufacturer specifics) and one custom service (for a remote-controlled thermostat… the “hello world” of BLE) using some random 128-bit UUID.
<?xml version="1.0" encoding="UTF-8" ?>
<configuration>

    <!-- 1800: org.bluetooth.service.generic_access -->
    <service uuid="1800" id="generic_access">
        <description>Generic Access</description>

        <!-- 2A00: org.bluetooth.characteristic.gap.device_name -->
        <characteristic uuid="2A00" id="c_device_name">
            <description>Device Name</description>
            <properties read="true" const="true" />
            <value>Keyfree Device</value>
        </characteristic>

        <!-- 2A01: org.bluetooth.characteristic.gap.appearance -->
        <characteristic uuid="2A01" id="c_appearance">
            <description>Appearance</description>
            <properties read="true" const="true" />
            <!-- 128: Generic Computer, Generic category -->
            <value type="hex">0080</value>
        </characteristic>

    </service>

    <!-- 180A: org.bluetooth.service.device_information -->
    <service uuid="180A" id="device_information">
        <description>Device Information</description>

        <!-- 2A29: org.bluetooth.characteristic.manufacturer_name_string -->
        <!-- (support for this characteristic is MANDATORY
              according to the profile spec) -->
        <characteristic uuid="2A29" id="c_manufacturer_name">
            <description>Manufacturer Name</description>
            <properties read="true" const="true" />
            <value>My SuperDuper Company</value>
        </characteristic>

        <!-- 2A24: org.bluetooth.characteristic.model_number_string -->
        <characteristic uuid="2A24" id="c_model_number">
            <description>Model Number</description>
            <properties read="true" const="true" />
            <value>TESTTHERMO-0001</value>
        </characteristic>

    </service>

    <!-- our custom stuff, a thermostat you can log into to
         read and set temperature -->
    <service uuid="DA8B4058-43A7-42D3-A8EE-7C3E4CD278E0"
       advertise="true" id="myservice">
        <description>My Custom Service</description>

        <characteristic uuid="A3163C48-022E-4466-9B70-94189FEF7D32" id="c_login">
            <description>Login</description>
            <properties read="true" write="true" />
            <value length="128" type="user" />
        </characteristic>

        <characteristic uuid="28735C16-CFA8-11E2-BED6-FB606188709B" id="c_temp">
            <description>Temperature</description>
            <properties read="true" write="true"/>
            <value length="12" type="user"/>
         </characteristic>

        <characteristic uuid="CB797832-6769-4C61-8833-BFE45466E4D0"  id="c_is_heating">
            <description>Is Heating</description>
            <properties read="true" write="false"   />
            <value length="1" type="user" />
        </characteristic>

    </service>
</configuration>
Though this example XML is specific to the Bluegiga devices, it still gives you a good idea of how everything is setup in the GATT.
The services allow you to group characteristics together. The characteristics can either be readable, writeable or both and either return some hard-coded value (those with const=”true” attribute set in their properties tag) or let you decide what to do on access dynamically (the value tags with type=”user”). These will be reliably transmitted between client and server, whereas there are other types of characteristics you can use when reliability is less important (think of it as TCP vs UDP transmissions) but we won’t cover those here.
There’s a bit of boilerplate in there, in that there are standard services and characteristics you need to provide to make everything go smoothly. You should ensure you have the “Generic Access” service, with the two mandatory characteristics (device name and appearance–a two-byte value selected from here)
The Device Information Service is meant to expose manufacturer info. If you want to claim your device conforms to the service, you’d have to include a number of other (read) characteristics, like firmware revision and serial number (more info on the DIS page).
From a developer’s point of view, most of the interesting stuff is in the last (custom) service. The BLE device will notify you, somehow (exact method being device-specific), when a connected user tries to read or write to these and you can respond however is appropriate.
In the example scheme above, you could implement the Login characteristic such that when the client reads it, it returns a unique challenge, which is then to be used to generate a response using a secret shared with the thermometer device. When ready, the client then perform a write of the appropriate response to that same characteristic and, if all goes well, it is now logged in.
A similar idea is shown with the temperature, where reading it could return current room temp, while writing would set the thermostat’s target. Or you could use separate read and write characteristics, to implement a clearer getter/setter type API.
The main idea is that the GATT allows you to expose a kind of API–the attributes you will allow the connected client to read and write to. Once the GATT is setup, the rest of the action happens dynamically during operation.
We’ll discuss this more in the Server section of this guide.
Client: Accessing services
The other side of the conversation is the client–in most instances, the connection master. It’s possible to query the service provider to discover which services and characteristics are available, and we’ll go over that in the example client code. However, at the loss of some flexibility down the line, you can greatly simplify things when you are already aware of the GATT used by the service provider.
When you already know the UUIDs of the characteristics you are interested in reading/writing, you can forgo a lot of discovery, connect and just start playing.
The process from the client’s point of view is usually to start off scanning for a device of interest and, when found, establish a connection as the master. Then you can query the device about services and characteristics or, as mentioned, you can just begin issuing read and write commands to pre-set characteristics.
How this is implemented is of course device-dependent. The example client code will be using the Bluegiga BGLib but the idea should be generalizable to other platforms. This series includes a complete example using the BLE112 to create a universal Bluetooth Low Energy client.
Harware selection
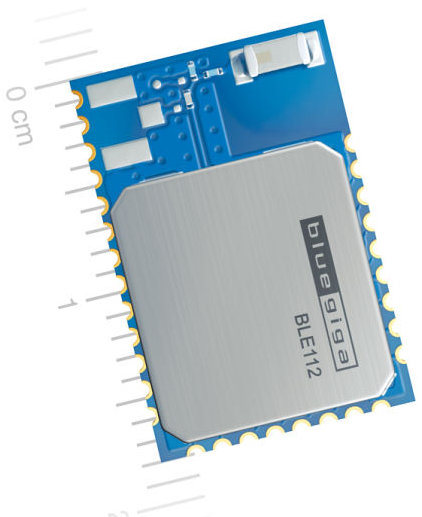
Bluegiga BLE112
There are a few components available to talk BLE. Most (if not all) are based on the Texas Instruments CC2540.
The Bluegiga BLE112 was selected for a number of reasons, including its relatively low cost, but the most important was its BGLib–a pretty slick API that allows for complete control over the device and asynchronous (event-driven) operation from a distinct host (a separate microcontroller). BGLib is written in “almost platform-agnostic” C (there are a few Arduino specifics, but it would be easy to migrate).
The BLE11X family also has an onboard scripting language (BGScript) that you can use with applications such that you don’t even need an external host–everything runs on the CC2540’s onboard 8051 MCU in those cases. It’s neat, but I preferred going the AVR/Arduino+BGLib route instead because:
- it meant coding in C/C++ rather than learning a domain- (and vendor-) specific language;
- it keeps the BLE112 firmly in the comm-layer, so I’m not too tightly bound to the platform should I decide to switch;
- you avoid needing to whip out the cc-debugger everytime you make an update to the program; and
- if you need to do anything fancy, programming directly for the underlying CC2540 will cost you an arm and a leg (no GCC support, you have to spend thousands on one specific compiler, ick!).
So all the code here will be BGLib-based examples. You could use this BLE Breakout presented here either way–as a stand-alone using BGScript or with BGLib and a seperate host–as all it really does is provide regulated power, access to the I/O pins and USB.
Module: Home-made BLE USB Breakout

BLE112 Breakout, in use in layered prototype
Before we can play and either start providing services or consuming them, we need some actual hardware. The following discussions will all assume you are using an Arduino to speak to a Bluegiga BLE11X device–in my case, this is a Uno interfacing with a BLE112.
There are a number of breakout boards available for the BLE112–some pre-built and others as kits–and you can use any of them. If you are able and willing, you can make the one presented here yourself relatively easily. The breakout board I developed is designed to meet the following objectives:
- Be single sided–to allow easy DIY PCB manufacturing;
- Provide access to all I/O and pins;
- Allow for simple firmware uploads, using the TI programmer;
- Allow for connection through USB;
- Be laid out in a way that reflects the BLE112 module itself, to minimize the differences between prototype and production boards.
If you wish to build you’re own version of this module, you’ll need a BLE112 and a handful of standard components.
See the BLE breakout page for all the details.
BLE Project Pages:
[siblings]