Here we’ll explore acting as a BLE master and client, connecting to a slave and manipulating the characteristics available. If you haven’t already checked it out, this series‘ BLE crash course is worth a look first.
As mentioned [#hardware selection], the client code is written using BGLib for use with a Bluegiga BLE11X and tested using the BLE USB Breakout, but the main ideas should be applicable to other BLE solutions.
The program is very general–since I have no idea what kind of server you’ll be connecting to–and, thus, a little more involved than it could be if it were written with a particular set of services/characteristics in mind.
If you want to play along, find some way to connect an Arduino to a BLE112 (e.g. the breakout board), then compile and upload the client program to the Arduino.
The client program was created using SerialUI. Once it’s running, you can connect to the Arduino through the Serial Monitor or use Druid4Arduino to get a graphical (GUI) version of the same interface. Here’s a little demo of the program in action:
BGLib
Because of the nature of the beast when connecting to a remote device, we never know what will be returned to us from the other side or exactly when that’ll happen. To avoid getting stuck waiting on responses from the slave, and to be able to handle whatever comes back to us in whichever order, BGLib uses a callback system.
Your first step, when programming with BGLib, is to define functions of the appropriate types (the callbacks) that will handle responses and events you’re interested in. Once these are written, you create a BGLib instance and inform it of all the callbacks you want to use before doing anything else. For example
// define a function that will be called on time-outs
void myTimeoutHandler() {
   mySerialUI.println("Oh noes! We timed out!!");
}

// create a global instance of the ble112
BGLib ble112(&someSerialPort, 0, 1);

void setup() {
   // do setup stuff...

   // assign the callback
   ble112.onTimeout = myTimeoutHandler;
}

// ...
BGLib Callbacks
There are three types of callbacks used with BGLib. A few are internal system stuff, like the onTimeout attribute which is a function that may be called pretty much any time by the library.
Then there are:
- Response callbacks: called when you get a response to some command you’ve issued, which only happens at some point after you’ve told the BLE11X to do something; and
- Event callbacks: called when the BLE11X notices some event, for example receiving an advertising packet, which may happen at any time.
Each callback has some particular function signature that you must keep to in order to assign it to the ble112 instance. Response callbacks allow you to check the results of commands you issue, and they are identified as ble_rsp_* attributes in the BGLib object. So, if you want to know whether setting the scan parameters has worked out, you’d define an appropriate callback:
// create the scan parameter settings response callback
void mySetScanParamsResponseHandler(const ble_msg_gap_set_scan_parameters_rsp_t *msg) {
   // here, we check the result in msg->result and act accordingly
}

// create a global instance of the ble112
BGLib ble112(&someSerialPort, 0, 1);

// tell the BGLib object about the callback
void setup() {
   // ...

   ble112.ble_rsp_gap_set_scan_parameters
             = mySetScanParamsResponseHandler;

}

{
   // ...
   // at some point down the line, we
   // actually set those params, e.g.:
   ble112.ble_cmd_gap_set_scan_parameters(75, 50, 1);

   // and checkActivity() to handle
   // the response
   ble112.checkActivity(50);

   // ...

}
One thing to note is that, after issuing the order to set those scan parameters, we made a call to checkActivity(). This function gets called a lot in your code, because it’s the place where we give the library a chance to check its message queue for responses and events. For whatever is lying around since the last call to checkActivity(), BGLib will figure out the type of response or event and actually trigger your callback (if you set one for that particular response/event).
You can call checkActivity() without a parameter, in which case BGLib will just check if there’s anything on its stack and return immediately if not. With a timeout parameter, checkActivity() will wait up to that amount of time for messages to come in. In the example above, I’m certain something will soon show up in the queue–because we just issued a command–and I want to process the result immediately, so I put a timeout value in the checkActivity() call.
Event callbacks are very similar, the only differences being that the BGLib attributes are named ble_evt_* (e.g. ble112.ble_evt_connection_status) and we have no idea exactly when they’ll be called. This means that you may want to call checkActivity() after every command you issue, but you’ll probably need to have an additional periodic checkActivity() in your main loop, so you can process all the events that come in asynchronously.
I like the callback system and find it works pretty well, with one caveat. There are a few event callbacks that are used under a bunch of varying circumstances.
The procedure completed callback (ble_evt_attclient_procedure_completed) gets called under a variety of cases… Any kind of request that can cause a number of callbacks to be triggered (or called repeatedly), like querying the other side for information about services or characteristics, will end by triggering your ble_evt_attclient_procedure_completed.
The client code presented here uses a simple state flag, and a few if/else switches, to deal do the right thing in this callback depending on what we’re up to at the moment it’s called.
Another “multipurpose” function is the ble_evt_attclient_attribute_value callback. In this case, the callback has only one use–providing you with the value of an attribute you’ve requested–but what that *means* can vary a lot. In the sample client program, we spend a lot of setup time querying the server about which attributes are available, their names and such. In this case, the flag + if/else switching would have worked but it meant having a monster function with a whole bunch of unrelated stuff within.
To alleviate the issue, the client code dynamically re-assigns the ble112 callback depending on the current state/activity. This means that there are three distinct functions that act as the ble_evt_attclient_attribute_value callback at various points of the program execution.
Scanning
The first step is to list the BLE devices that are advertising in the area, to know which one we’ll be connecting to. If you enter the scan command, the (SerialUI) command callback follows these steps:
- close any open connection and cancel on-going scanning
- Set up the scan parameters (calling ble_cmd_gap_set_scan_parameters())
- Enable GAP discovery (calling ble_cmd_gap_discover())
While GAP discovery is on, the callback assigned to ble_evt_gap_scan_response will be triggered every time the BLE112 sees an advertisement packet. This implies that, if you leave it on long enough, you’ll see the same device repeatedly. In the client is currently scanning for advertisers (StateAdvertiserSearch state in the program), it adds new addresses to the device_addresses_scanned list.
During our scan, we repeatedly call checkActivity() and after a little while, output the list of addresses we’ve found.
Connecting
When you decide to connect to a device (after scanning the environment), the connectBLE() function is called. Here, you select one of the discovered addresses as the device you wish to connect to and we go back into scanning mode.
This time, the state we’re in when the ble_evt_gap_scan_response is called isn’t StateAdvertiserSearch, so what happens is that we wait to see a packet coming from our selected device and, when it comes in, we issue a command to connect to that device using
ble112.ble_cmd_gap_connect_direct(msg->sender,
       msg->address_type,
       0x06, 0x0c, 0x200, 0);
This will, eventually, cause our ble_evt_connection_status callback to see some action. If, when called, we’re told the connection attempt was successful, the program starts a long chain of requests with the goal of discovering all the attributes available, along with their properties (read/write-able and name).
The whole process is a little complex, because we have no pre-set notions about the services and characteristics we’ll find. In short, we issue a request (ble_cmd_attclient_read_by_group_type()) and then will chain further requests in the response/event handlers as they are called. I’m not thrilled with the code as it stands (pretty hairy), but it does the job and gives you something to start with in grokking it all.
One thing to note is that, during this process, requests are issued in callbacks which cause other requests to be issued which cause other callbacks to be called which issue other requests… etc. we need to make sure we call checkActivity() a lot and we don’t want to do it from within the callbacks as we have no idea how deep our call stack will end up. Instead, the connectBLE() function uses a little macro:
CHECK_BLE_REPEATEDLY(10, 400);
which, in this case, waits for 10 milliseconds and calls checkActivity… 400 times! This implies you’ll sit around for 4 seconds (at least) while everything is being setup.
Reading attributes
After all of that, reading attributes is actually pretty easy. Since one of the things we did in our chain of requests during the connection was query the server about the available characteristics and stash the returned handles, making requests to read attributes just involves issuing a
ble112.ble_cmd_attclient_read_by_handle(connection_id, attribs_chrhandle);
After that command, you checkActivity() until you get a response which triggers the ble_evt_attclient_attribute_value handler. In there, the ble_msg_attclient_attribute_value_evt_t (struct) parameter you receive has the value of interest stashed in its msg->value (a uint8array, which is another struct with a length and data params).
Writing attributes
You can write (up to 20 bytes of) data to a characteristic by ble_cmd_attclient_attribute_write with an array of bytes:
ble112.ble_cmd_attclient_attribute_write(connection_id, attribs_chrhandle, len, data_bytes);
When the server responds, your ble_evt_attclient_procedure_completed callback will be called and you can tell how well things went by checking msg->result: anything but 0 is bad news.
Running the client code
The demonstration client I created requires two serial ports–one to interact with the BLE112 and the other for use with SerialUI, so you can control the device. If you’re going to run it on a standard (ATMega328-based) Arduino–which has only one hardware UART–you have to use SoftwareSerial or the equivalent for one of the serial connections.
At first I was using the Hardware Serial for SerialUI and the SoftwareSerial for the BLE112. I’ve worked on production projects where this setup works fine but if you’re prototyping on a breadboard, with jumpers running around everywhere, the SoftwareSerial’s flakyness may become an pretty big issue (even–or maybe particularly–at low baud).
So I’ve enhanced SerialUI to be able to use the SoftwareSerial (starting with version 1.8) and the client code is by default configured to connect SoftwareSerial->SerialUI and HardwareSerial->BLE112. You can change this, as well as numerous other settings, using the various #defines at the top of the code listing.
If you are using SerialUI through the SoftwareSerial, you’ll need to somehow get your computer to speak with it through USB. To do so, I connected an FTDI-type module to appropriate pins on a sippino prototype installed on a breadboard, so the FTDI connectors Rx would be tied to the Arduino’s (Software) Tx and vice-versa.
Here’s the setup used to create the demonstration video above. In the back is the “remote device” (which also uses a BLE-USB breakout, directly on the PCB). The client runs on the Sippino (Arduino clone), which has its (hardware) serial UART connected to the BLE breakout board and its SoftwareSerial hooked up to the FTDI connector (so we can interact with the program’s SerialUI interface).
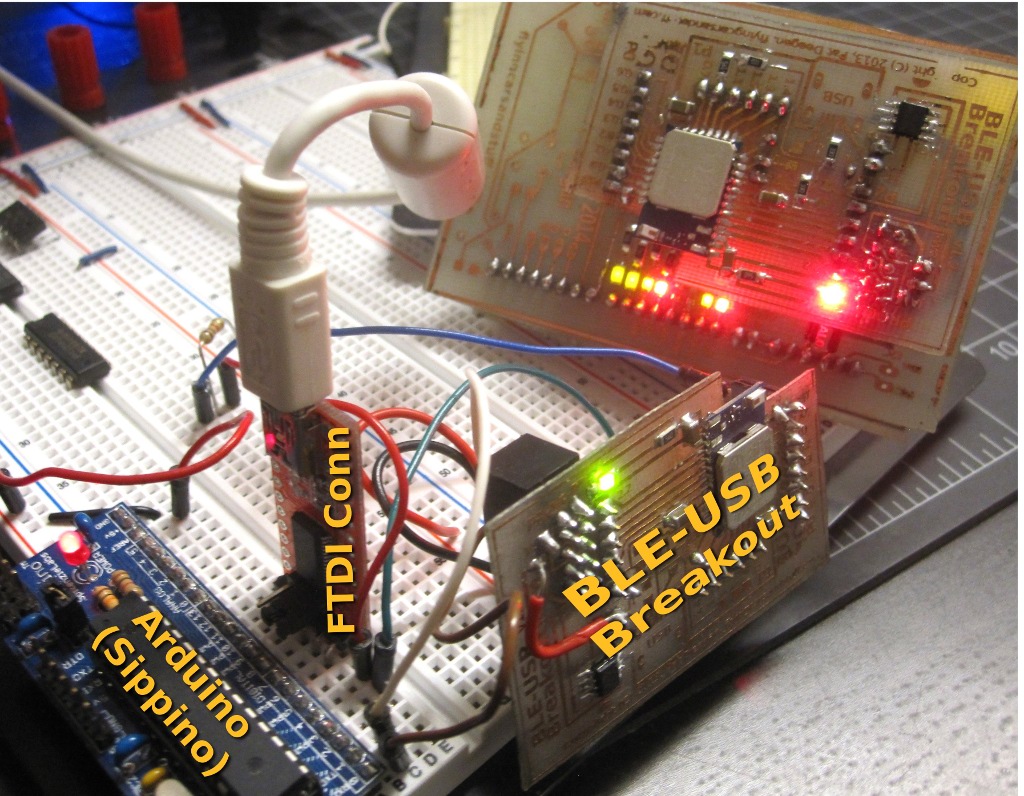
BLE prototyping setup
You should also note that the BLE-USB breakout has its reset pin held high, by tying it to a pullup resistor (i.e. that goes to VCC). This was also tied to the Arduino’s BLE_RESET_PIN so that we can reset the Bluegiga BLE112 using the client interface.