I’m a big fan of Atmel AVR-based projects, Arduino stuff in particular. Though I support the Arduino community by buying and using official parts, like the Uno, I also enjoy exploring spin-off projects such as the Digispark because they sometimes better address particular needs (e.g. space constraints). Also, I like to play.
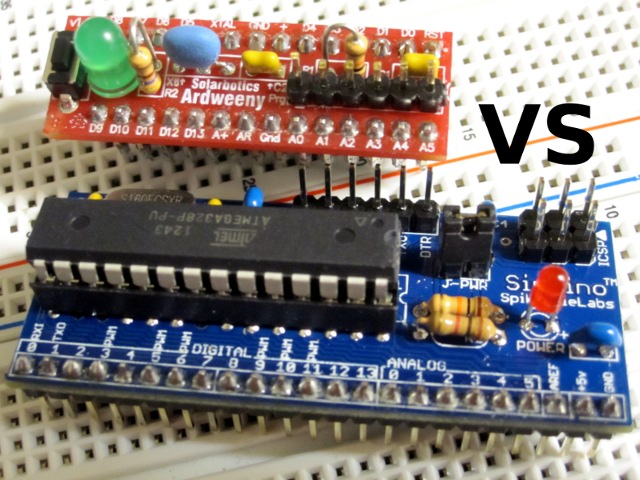
Here I’ll review and compare two of my favourite Arduino-compatibles. In one corner, wearing red, the Ardweeny and in the other, sporting blue trunks, the Sippino.
Ardweeny
 The Ardweeny, by Solarbotics, is one of the smallest ATmega328-based Arduino-compatibles around. Inspired by Kimio Kosaka’s “One-Chip-Arduino“, its self-contained stacked design (the PCB piggybacks on the chip) allows the system to fit in a project while taking no more space than the footprint of the ‘mega328 (a 28 pin DIP). It comes with a nice 8 page booklet, with clear instructions.
Other than the pins and the small PCB, the entire system is comprised of only 7 parts–through-hole components that make building it pretty easy, even for beginners. Ardweeny uses a 16MHz resonator, which saves you from soldering the two capacitors you’d need with a crystal, and includes a momentary contact switch on the PCB to allow you to reset the device manually.
In order to keep part count and costs low, the Ardweeny exposes a 6-pin header to which you must attach a USB-to-TTL (“FTDI-type”) cable in order to program the device (not included). This connection to the USB may also be used to power the device (and any circuit you build around it) and/or to communicate with it using the serial monitor.
The green LED and resistor R2 are tied to pin 19 (D13 in Arduino-speak) and are optional, even if step 5 in the booklet states that “it’s an Arduino-clone. It has to have a pin-13 LED installed onboard!” ;-)
For the most part, construction is easy and straightforward. The only caveat is the potential difficulty of attaching the printed circuit board on the mega328’s back, in the final step. It isn’t that soldering the header pins to the MCU’s legs is that hard but that if you overdo it, you end up with solder running down the DIP legs and causing interference when it comes time to place the Ardweeny in-circuit.
I’ll usually use a 28 pin DIP socket in my projects, which allows me to easily remove the Ardweeny to stick it somewhere else or program it (in some projects, I re-purpose pins that are used by the UART or reset in ways that interfere with programming so simply popping it out for uploads solves the issue). Extra solder down the pins doesn’t impact sockets too much, it’s mainly an issue with breadboarding: I don’t want to force the legs in or leave any solder gunk in my breadboard.
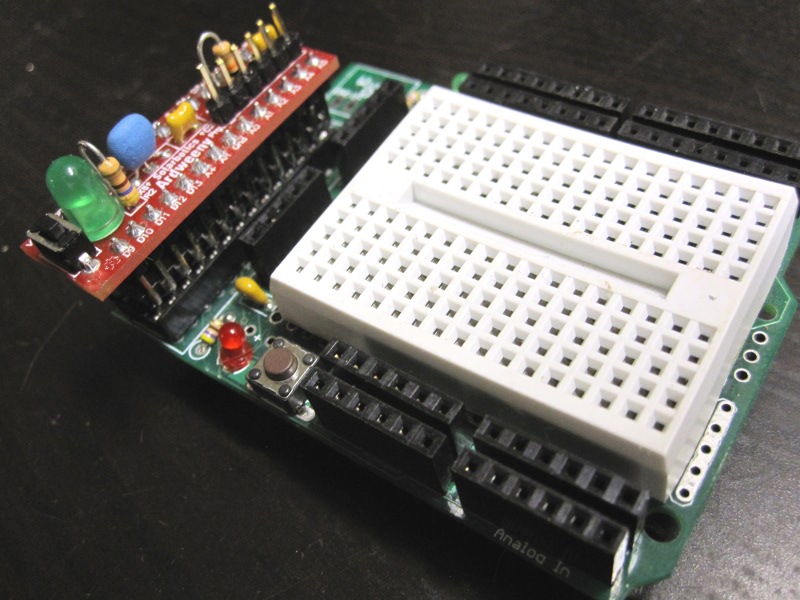
Wicked Device’s ArdweenyProto
For prototyping with Ardweeny, I use the Wicked Device ArdweenyProto. It has a socket for the Ardweeny, includes a tiny breadboard and, more importantly, headers to connect to all of the pins (though the indications are a bit difficult to see if you install both rows of headers, as I did).
Sippino

Working Sippino
The Sippino, by SpikenzieLabs, is another Arduino-compatible that I enjoy using. Like the Ardweeny, it requires a USB-to-TTL cable/breakout to program and has a 6 pin header to do just that.
The Sippino kit is comprised of 11 through-hole parts, along with the PCB and header pins. Though relatively small its claim to fame isn’t size but, as the name implies, the fact that all its digital and analog IO pins are brought out into a single line of pins (SIP). This allows you to easily insert the device into a protoboard or solderless breadboard. It doesn’t come with an instruction booklet–greener, I concede–but its construction is well documented online.
In the Sippino’s case there’s no tricky soldering of the PCB onto the chip, so construction is even easier than that of the Ardweeny. In addition, it comes with a 28 pin socket for the microcontroller which means that there’s no risk of overheating the chip while soldering–perfect for beginners. The Sippino forgoes including a reset switch, but I have to admit I don’t think I’ve ever used it on the Ardweeny.
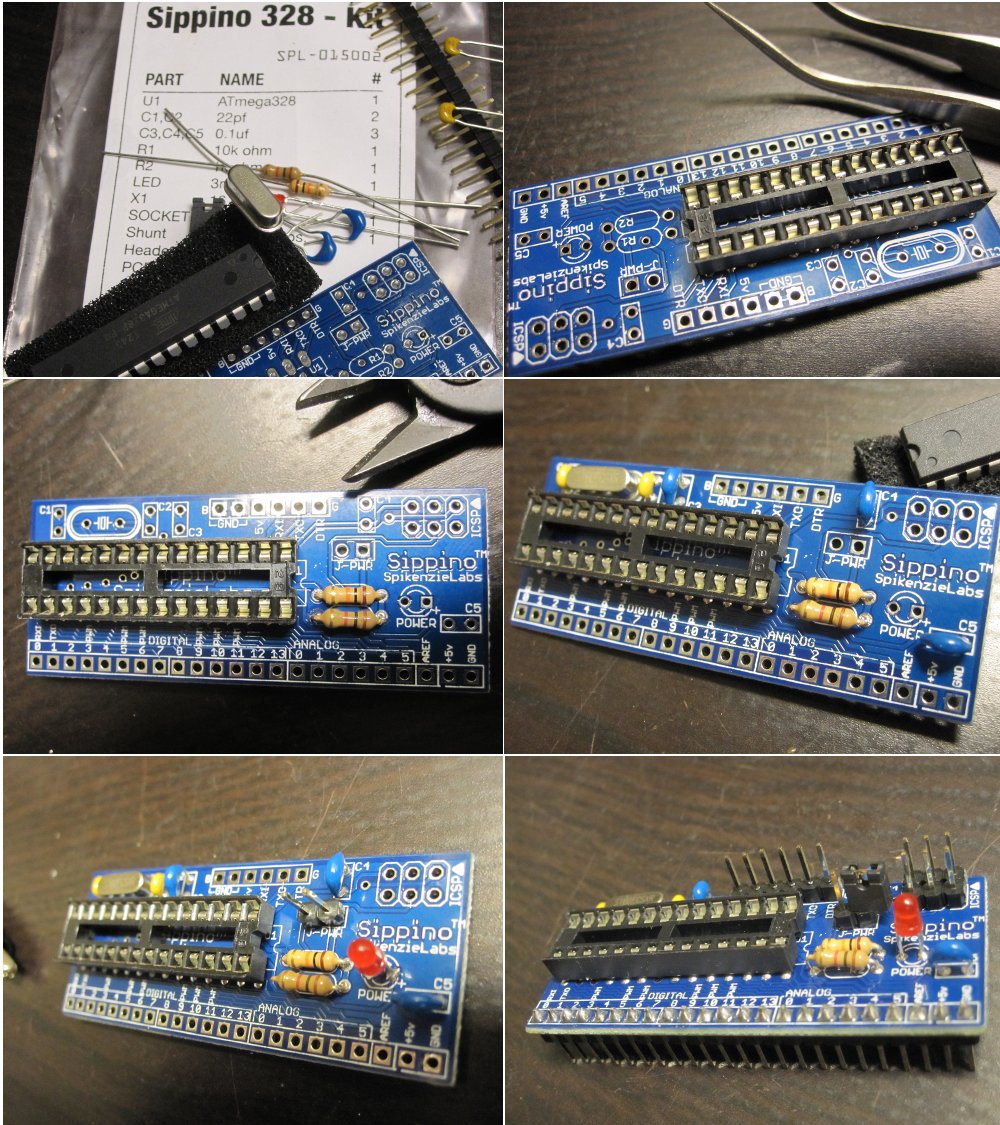
Building the Sippino in 6 easy steps
Like the Ardweeny, this project also comes with a LED but in this case it’s a bit more useful: it is a power indicator that doesn’t interfere with any of the I/O pins.
One touch I really like is the inclusion of a jumper to select whether the 5 Volt on the FTDI programming connector and the rest of the 5 Volt bus on the Sippino (including the +5 volt pin on the pinout edge) are connected or not. In Ardweeny projects I usually include a similar jumper on my final PCB, here the work is already done for you.
Another thoughtful aspect is the inclusion of an ISP header (for ICSP programming, as discussed here). Not many people use this, since Arduinos make programming through USB so easy, but I certainly do and am quite happy the header was included.
On a final note, and though probably a fluke, one thing I did not enjoy was discovering this when I opened the kit:
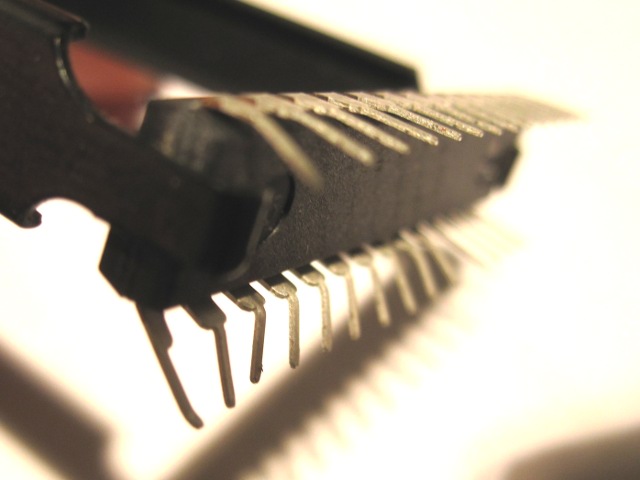
Ouch! ATmega328 from Sippino kit. hmm.
The ATmega328 had apparently been jammed into the conductive foam, opposite the socket, in a way that had a somewhat deleterious effect on the legs. I carefully straightened them and everything worked out OK but, c’mon guys, not cool.
Update (2013-12-03): A week after publishing this post, I received a message from Andrew Harrow (lead idea guy @ spikenzielabs) who was rather aghast at discovering my sad account of distorted pins. He related how they perform “mock postal system abuse” tests (a sort of in-office ultimate frisbee, to prove their packaging methods) and how such damage was very unlikely barring a good and purposeful stepping on while on route. I have to say that I’ve ordered from Spikenzielabs before and the process had always been fast and flawless. He even offered to let me try the new Sippino USB kit and sent one out forthwith. Had I suspected such a level of customer support, I’d have contacted them directly at the onset. Needless to say, Spikenzielabs is still high on my list of suppliers–perhaps even more so now.
Verdict
I mainly love the Ardweeny because of its tiny footprint and low price. I may develop using, say, a Uno or the Sippino but will design my printed circuit boards with an Ardweeny in mind because they’re cheap and are easy to leave embedded in small packages.
The Sippino, on the other hand, is about twice as expensive and is less amenable to permanent inclusion in a circuit. But that’s not the point with this device: it’s really a development board. I’ve enjoyed prototyping with it, both because it’s designed to be used on breadboards and because of the features described above. The ISP header is pretty important to me these days, both for interaction with an in-circuit serial programmer and simply to get easy access to the SPI lines in a standard connector.
In the end, putting these two devices up against each other is something of a false dichotomy: though they’re both small Arduino compatibles, they serve different purposes and I’ll gladly continue to use both. The price difference is less important because of the way they’re used: I end up spending more on the Ardweenys just because they wind up dedicated in various devices, whereas I can reuse the Sippino over and over while prototyping.
I hope the info presented here can help you decide if either of these modules might be useful in your own hacking adventures. As always, if you’ve got questions or comments feel free to contact me.