Using the LitePlacer pick and place with openpnp isn’t just possible, it’s pretty awesome. I’ve used both together for a few months now, to assemble over 100 PCBs of varying levels of complexity.
It is quite reliable down to 0402 components, with or without bottom vision (which is amazing, when it works–see below).
I’ve got numerous examples of it in use online, but the best openpnp specific video is:
Check it out for many tasty deets. Here, I’ll provide a bit more info on actually getting setup.
Setting up for OpenPnP
The first thing to do would be to get the machine running using the LitePlacer software, just to eliminate a whole lot of variables. Once it’s running, install the lastest/greatest OpenPnP, namely a version 2.x as that’s what I’ve been using.
Z Limit Switches
To get a LitePlacer working with openpnp, there’s one hardware mod that’s required–it’s tiny but important: the interpretation of the z-limit switches is inverted.
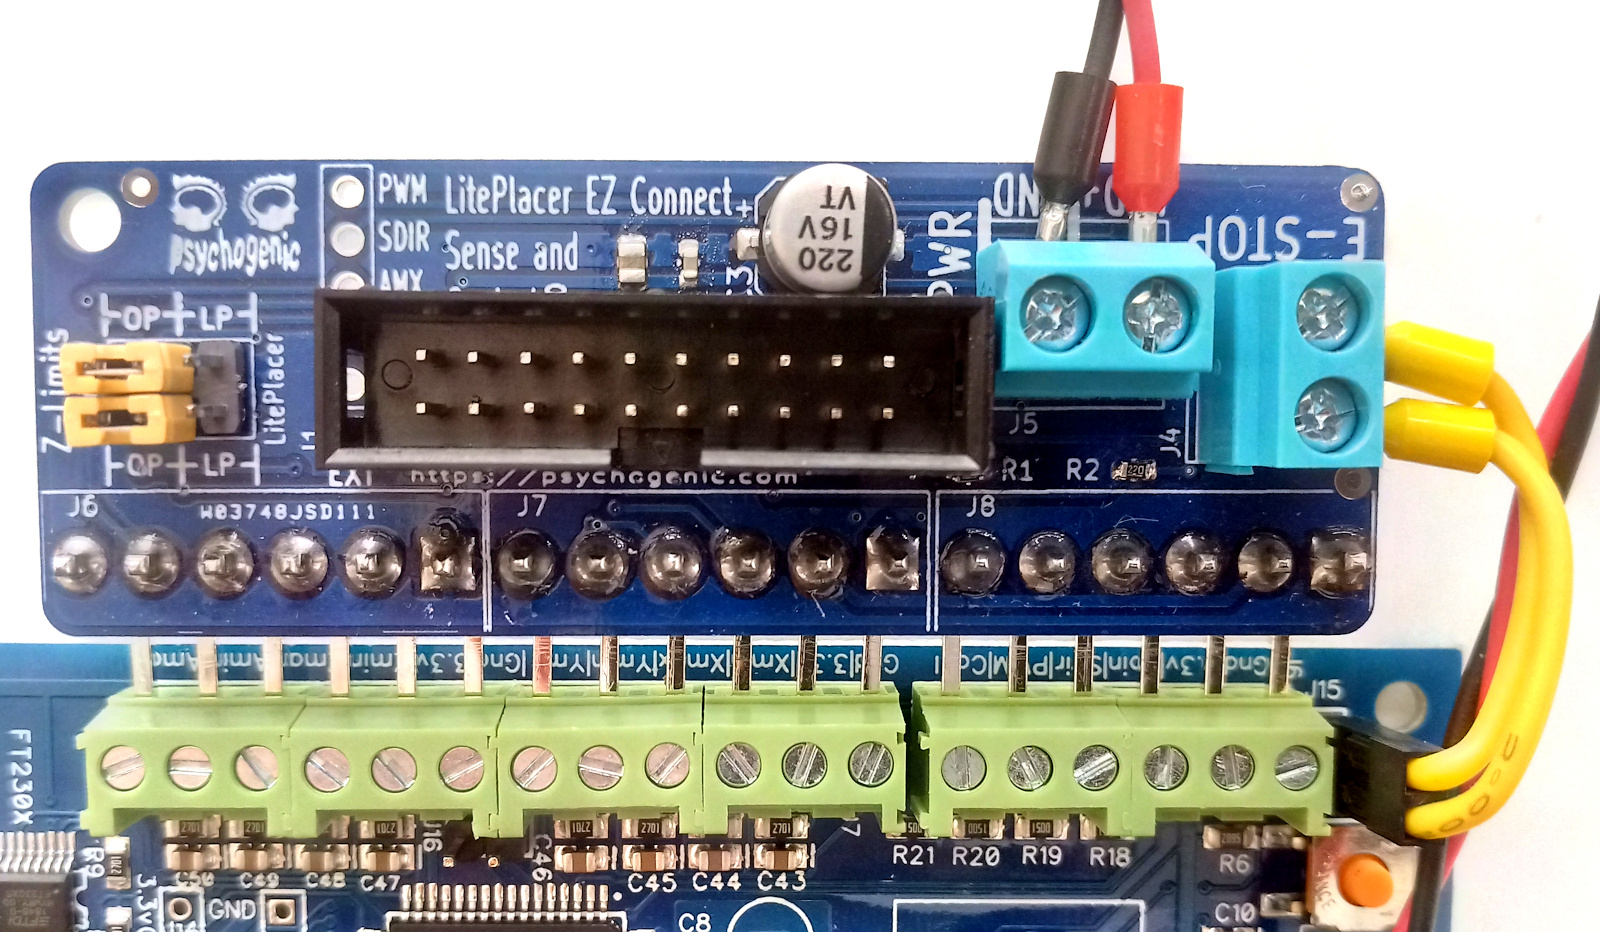
If you’ve got an TinyG EZ Connect board, it’s just a matter of setting the jumper on the sense and control wing to “OP” rather than “LP”. Otherwise, just flip the wiring to the tinyG for the limit switches.
Configuration Example
As a relatively complex machine, the PnP requires a decent amount of configuration. With openpnp this happens in the GUI and is stored in a number of xml files, the most important being machine.xml.
To simplify things for you, here’s a recent iteration of my own machine.xml file.
WARNING: this thing works for me, but all the coordinates are specific to my system, so don’t go and start changing nozzle tips or anything before doing a proper config!
The most important part of that file, in terms of working with the liteplacer, is setting it to use the GCodeDriver and putting in all the right GCode for commands:
- CONNECT_COMMAND is all the speed and scaling setup, etc
- MOVE_TO_COMMAND is to get it to a specific set of coordinates
- POST_VISION_HOME_COMMAND resets the coord system after a visual home
etc.
There’s a terminal you can use to send gcode directly to the TinyG and I used this a lot to figure out a decent but reliable speed.
For reference, here’s the connect command section for the Liteplacer/TinyG that sets up all the config that’s been working for me:
<command type="CONNECT_COMMAND">
   <text><![CDATA[$SV=2]]></text>
   <text><![CDATA[$ME ]]></text>
   <text><![CDATA[$1pm=1]]></text>
   <text><![CDATA[$2pm=1]]></text>
   <text><![CDATA[$3pm=1]]></text>
   <text><![CDATA[$4pm=1]]></text>
   <text><![CDATA[$mt=1000000000]]></text>
   <text><![CDATA[G21 G90 G92 X0 Y0 Z0 A0 M8 M5]]></text>
   <text><![CDATA[$xjm=1200]]></text>
   <text><![CDATA[$xvm=10500]]></text>
   <text><![CDATA[$xsv=2000]]></text>
   <text><![CDATA[$xsn=3]]></text>
   <text><![CDATA[$xjh=800]]></text>
   <text><![CDATA[$xsx=2]]></text>
   <text><![CDATA[$1mi=8]]></text>
   <text><![CDATA[$1sa=0.900]]></text>
   <text><![CDATA[$1tr=39.9990]]></text>
   <text><![CDATA[$yjm=800]]></text>
   <text><![CDATA[$yvm=10500]]></text>
   <text><![CDATA[$ysn=3]]></text>
   <text><![CDATA[$ysx=2]]></text>
   <text><![CDATA[$yjh=800]]></text>
   <text><![CDATA[$ysv=1800]]></text>
   <text><![CDATA[$2mi=8]]></text>
   <text><![CDATA[$2sa=0.900]]></text>
   <text><![CDATA[$2tr=39.93]]></text>
   <text><![CDATA[$zjm=2000]]></text>
   <text><![CDATA[$zvm=3000]]></text>
   <text><![CDATA[$zjh=2000]]></text>
   <text><![CDATA[$zsv=1500]]></text>
   <text><![CDATA[$xfr=8000]]></text>
   <text><![CDATA[$yfr=8000]]></text>
   <text><![CDATA[$zfr=3000]]></text>
   <text><![CDATA[$afr=20000]]></text>
   <text><![CDATA[$3mi=8]]></text>
   <text><![CDATA[$3sa=1.800]]></text>
   <text><![CDATA[$3tr=8.0000]]></text>
   <text><![CDATA[$ajm=600]]></text>
   <text><![CDATA[$avm=20000]]></text>
   <text><![CDATA[$4mi=8]]></text>
   <text><![CDATA[$4sa=0.900]]></text>
   <text><![CDATA[$4tr=160.0000]]></text>
   <text><![CDATA[$mt=300.00]]></text>
   <text><![CDATA[$zzb=2]]></text>
   <text><![CDATA[$3po=1]]></text>
   <text><![CDATA[$zsx=3]]></text>
   <text><![CDATA[$zsn=0]]></text>
</command>
Setup
Once you’ve copied my sample machine.xml file over to the openpnp configuration dir (which is ~/.openpnp2 under Linux, no clue what it is for other OSes), plug in the webcams and the TinyG USB cable, power up the Liteplacer and start up openpnp.
If you see some camera action, awesome. Otherwise, you’ll need to twiddle the settings a bit.
The LitePlacer cameras are identical, so figuring out which is which is unobvious–both are listed as “USB 2.0 PC Cam” on my system. Try one and if it’s the right one, remember which it is listed as in the dropdown. Select the other for the second feed.
Note the cams in openpnp are in different spots. The downcam is attached to the head, as shown below, while the upcam is independent (in “Cameras”).
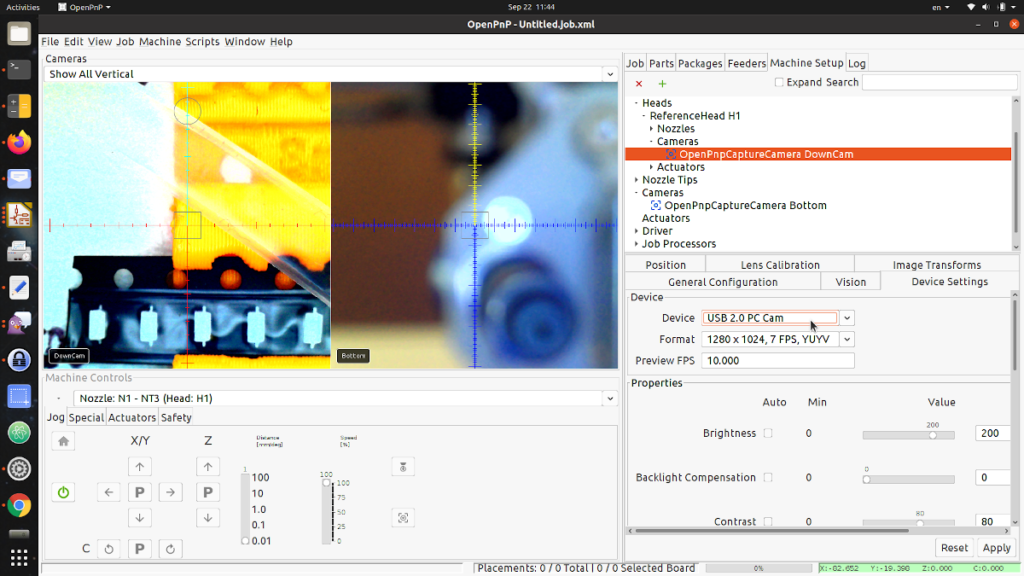
To keep this config between restarts, always have them plugged into the same ports prior to starting up openpnp, or it will just forget the device setting (ugh).
Once that’s working, try to connect using that green power button.
Sometimes the connection doesn’t work out the first time, if you just plugged in the TinyG usb cable or idunno. Just wait a tiny bit and try a second time.
If that works, huzzah, home the machine: keep your hand near the kill switch, just in case. This config expects that you have a marker somewhere nearby for vision homing and I can’t actually remember where I set that up (helpful, I know).
Finally, once homed, move the slider on the bottom left up to 10 and hit CTRL+right arrow and see if you get some motion.
If all that worked, looks like you’re setup. You should likely go into actuators and try the pump and valve, as well as test motion in all directions.
If you hit a limit switch, the tinyg will gag and you will lose your serial connection and openpnp will become annoyingly confused. May need to (save your configuration, in File -> Save Configuration and) close openpnp to restart it after moving the head away from that limit switch manually.
Calibration
Now you are ready to set everything according to your specific system. This includes position of bottom cam, various parking spots, confirming travel distance and squaring and all the stuff.
From this point on, you’re in straight-up openpnp land, so just follow the user guide
The biggest issue I’ve had with the LitePlacer + OpenPnP combo is the YUV camera choice for the system I got (still working that out, lots of details on this in the video above). Otherwise, it’s been a pleasure to use.
Enjoy your machine and build us some awesome stuff!