I’ve recently had to develop an application using the BLE Nano platform.
The BLE Nano is a little module built around the Nordic nRF51822 SoC, along with a minimalist set of support components including an on-board antenna for the bluetooth wireless connection. The Nordic itself provides all the Bluetooth low energy functionality and hosts your firmware. RedBearLab provides support for creating your apps either through the mbed.org system or using an Arduino-compatible SDK.
Here I’ll review my experience with the BLE Nano, detail my impressions of the upsides and downsides of the device as well as provide a few pointers that may help should you decide it’s a good choice for your next project.
Executive summary of my impressions: though you may face some obstacles with the BLE Nano, it’s a great little unit that’s easy to code for and combines a lot of punch in a very small package.
Upsides
The BLE Nano’s major selling points are its built-in Bluetooth v4 support and it’s tiny footprint–clocking in at only 18.5 x 21.0 mm… nice!
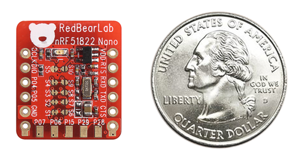 The combination of the Arduino SDK and the BLE_API make programming the device very straightforward for anyone familiar with Arduino and, if you’re used to Arduino on smaller ATMega chips, the Nordic SoC provides a good deal more space to play in: 128k of flash and 32k of RAM.
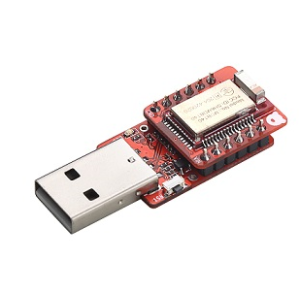 The MK20 programmer makes burning the firmware a breeze, as you need only sit the Nano atop the programmer and it–with a little mod to the config, described below–can be updated by drag & dropping a hex file or through the Arduino IDE directly.
Using pre-compiled hex files that include the bootstrap code can be a nice way to distribute code to your users/clients, as it sidesteps the whole environment installation and compilation steps.
Downsides
The BLE Nano does have, in my opinion, a few downsides. Here I’ll cover what I didn’t like so much and the solutions I found, where applicable.
Pin access
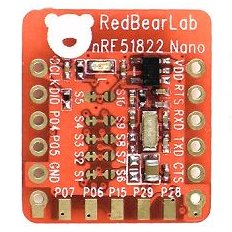
Officially, the BLE Nano has 11 pins available for I/O. One big annoyance, though, is that 5 of these (P06, P07, P15, P28, P29) have a weird layout and no means to attach through-hole pins like the others.
Getting footprint documentation was difficult, and I basically had to:
- figure out the dimensions (turns out these “SMT pins” are 100mil appart, 2.54mm, and positioned 50mil, 1.27mm, below the others);
- hack on a 90 degree pin header, and then trim the pins to match the height of the headers installed on the sides.
Not the end of the world, but it makes the experience less friendly than it could have been if through-hole connectors had been installed uniformly.
Config Switches
In order to keep the footprint tiny, only a subset of the nRF51822 pins are actually accessible.
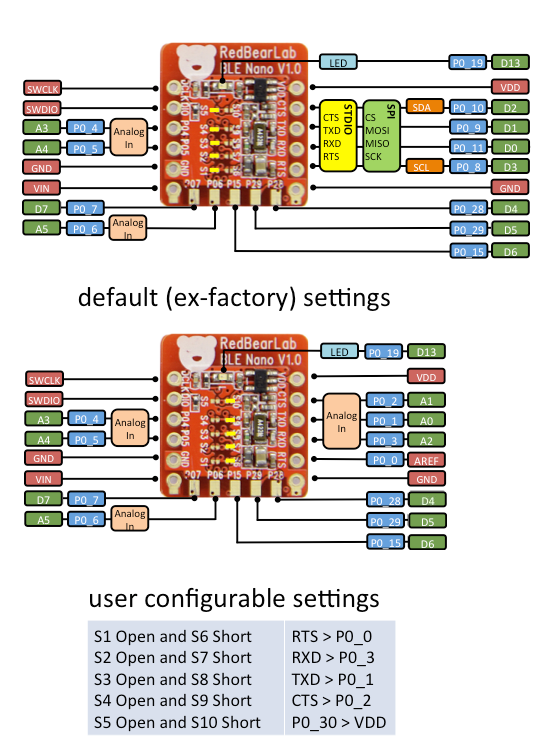
To allow for more flexibility, RedBearLab actually allows you to select between two different options for a number of the pins. For example, the “CTS” header pin can either go to P0_10 (CTS/SPI CS/I2C SDA) or to route to P0_2 (Analog In A1).
We couldn’t have used the device without this feature but my issue is the manner in which this is achieved: whenever you need to change the default configuration, you need to actually create a solder bridge between to (very small pads) and also cut a trace on the small PCB.
Even for someone who does a lot of SMT manually this can be difficult and, doing it more than once is likely to cause a mess.
No GATT Reads (!?)
As someone who’s developed on a few bluetooth low energy devices, I’m accustomed to dealing with the variations in different APIs. The BLE specs define the GATT and the various roles/states and types of messages exchanged between the devices so, in the end, if a system supports BLE then you usually end up with the same basic structures and feature set.
It came as something of a surprise to discover that the Nano’s BLE_API–at least the version I had on hand–didn’t support GATT reads! I’d assumed that, since we had an attribute database it would be possible to… you know… read the values within. But nope.
When I messaged the support team on this, their answer was basically “the BLE API comes from the mbed team and if it’s not available than there’s nothing we can do as we’re working on the next versions“. hum. I finally found a work-around for this, but it ain’t pretty (details below).
Support
Which brings me to another gripe I have with the Nano: support, or lack thereof. The fact is that RedBearLab provides a host of online forums for discussion and tech support related to their devices. These forums are pretty active, and the RedBearLab team do show up and usually provide an answer within a few days.
However, sometimes its more than “a few” days before anything happens (and sometimes it’s just never, like here and here).
I get that, since I take my time and read docs and do research before I ask a question, when I do have a one it’s usually harder to answer than a simple RTFM. Still, (I believe) the questions have merit even if they cover some weird edge case or non-standard use and the answers I’ve received have sometimes been a little too simplistic for the multi-day turnaround to make acceptable.
A final troublesome item: the mysterious mystery bug.
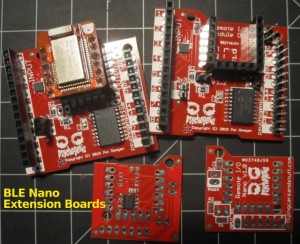
There are a number of interacting layers in the stack going from the bare nRF51822 to my Arduino-SDK code, so this is an issue that you are unlikely to encounter. Still, it was one of the rougher spots in my first dev experience with the device, so I mention it here. In essence, as I was developing for two use cases–one using a bare Nano, and the other with the Nano hosted on a extension–I started with the more complex situation (with the device embedded on the extension board) and all was well.
When all was done, I switched my compile directive to build for the bare Nano. Initially, all seemed ok but it soon became apparent that none of my analog reads were producing valid results. In fact, they were all returning the same value, a constant 0xff . These were the same analog inputs used in the extension board case, and recompling/testing mounted on the PCB still worked so… what?
I spent a good deal of energy rummaging through by code to isolate the critical difference between the two applications. In the end, it was… drumroll… a call to Wire.begin() ?
The extension board had an external EEPROM, which was accessed through TWI (I2C), whereas the bare Nano didn’t have the external memory nor use the Wire functions. Forcing a call to Wire.begin() in both versions would fix the problem, though I couldn’t figure out exactly why, and I couldn’t leave it in the code as making the call led to issues down the road with my use of the SDA/SCL pins.
A post to the support message board concerning this issue was pretty much ignored. I thought something related to clocks, timers and/or interrupts was being initialized as a side-effect of the Wire.begin() call, so I added a quick analogWrite() (on then off) call to my setup() function in the hope that this would have similar side effects and resolve my issue.
It worked. Still the combination of complex interactions and lack of support cost a lot of time.
Tips
In addition to the technique described above for the analogRead() mysterious mystery, here are a few tips and tricks that may help you along while developing with the Nano.
GATT Reads
If, by the time you read this, creating a callback for GATT attribute reads within you application is still impossible, you can use the technique I implemented: triggered notifications.
The trick here is to create a writeable attribute that can also provide notifications/indications. When you receive a write for the attribute–either any write, or some special code if you need to support real writes to the attribute–then you trigger an update to the attribute and notify any listeners.
On the app side, you register for notifications for every attribute you want to “read” from and, any time you want to get the value, write to the attribute and await the notification.
There are many variations on this scheme… you could have a centralized location (i.e. a single writeable attribute) that triggers any of the notifications according to a message within the write data.
You might also decide to have a single attribute providing notifications with content for any combination of the attributes, if you include meta-data. This is actually a solution to the problem of older Android devices, that have a very low limit to the number of attributes you can subscribe to (like 4 max, which is pretty low). The downside here is that you’re basically forced to recreate you’re own little GATT, because you have to deal with metadata to figure out which attribute is being “read” and you need to switch between decoding schemes etc… a pain.
My favorite solution is simply to have attributes that are write/indicate, something like:
GattCharacteristic rwAttr(uuid_rw_state, statePayload,
                           1, STATEPAYLOADLEN,
                           GattCharacteristic::BLE_GATT_CHAR_PROPERTIES_NOTIFY |
                           GattCharacteristic::BLE_GATT_CHAR_PROPERTIES_WRITE);
So, here the code is using the rwAttr by:
- writing [SOMEPAYLOAD] (with length > 1) to rwAttr in order to send data to the device; and
- writing a dummy byte (payload of length <= 1) to rwAttr in order to “read” by triggering a notification with the attribute data
D&D hex files
You can get the Arduino IDE to produce hex files that can be drag & dropped onto the MK20 “drive”, plugged into USB, by modifying IDE’s platform.txt file as describe in: Massage Arduino hex file into format suitable for drag & drop install.
In short, you need to find the Nano’s bootloader.hex and put it somewhere useful, say /PATH/TO/NANO, and edit the platform.txt tools.avrdude.upload.pattern to massage the hex file output by Arduino’s IDE to combine the bootloader and your code, e.g.:
tools.avrdude.upload.pattern=srec_cat "{build.path}/{build.project_name}.hex" \
      -intel /PATH/TO/bootloader.hex -intel \
      -o "/PATH/TO/NANO/{build.project_name}-dragndrop.hex" -intel \
      --line-length=44
With this modification, when you hit “Upload” on the Arduino GUI you end up with a /PATH/TO/NANO/projectName-dragndrop.hex file that you can copy over to the USB programmer (with the Nano installed) to burn the new program.
Summary
I’ve spent a lot more time on the BLE Nano’s downsides than on the positive aspects, but don’t take it to imply that I don’t like the device: I actually enjoyed using it very much and feel the Nano is a nice addition to my toolkit.
The small, low-powered, device takes a lot of the headaches out of dealing with Bluetooth Low Energy and because it combines the processor and bluetooth system on a single chip, reduces the parts count and cost for connected projects.
I hope you found this info useful. Now go play with a BLE Nano.
3 thoughts on “BLE Nano: Review, Tips and Workarounds”
Thank you, very insightful post which helped me decide to start playing with a BLE Nano myself. I wonder whether you’ve got a 1.0 or 1.5 version? The 1.5 has 32 kB instead of 16 kB RAM, I wonder how useable the old one is (whether it’s important to spend effort getting the latest one).
https://redbearlab.zendesk.com/entries/83313849-BLE-Nano-1-0-vs-1-5
I hope to get ANCS to work eventually, in order to capture and interpret iOS notifications. This example looks promising, but I’m not sure if it would run on the BLE Nano?
http://infocenter.nordicsemi.com/index.jsp?topic=%2Fcom.nordic.infocenter.sdk51.v9.0.0%2Fble_sdk_app_ancs.html&cp=4_1_0_4_4_1
Hi, with this board is it possible to customize the Advertisement data (EIR data) of the BLE nano? Is there any good alternative to customize the GATT server with read?
Yes, I’ve done projects where we transmitted arbitrary data through the advertisement packet… not much room, in there, but enough for a few flags and bytes.
The newer Nano, v1.5 at least, seems to do reads now, as it’s based on the S130 bootloader and has lots of new features. I’m playing with the device for a project now, and I’ll be putting a write-up about a few related things in the near-term.