Using VaRGB basically involves three steps:
- Figuring out how you want your red/green/blue values to vary;
- Setting up schedules of curves to meet your requirements; and
- Informing the VaRGB driver of the passage of time, so it can do it’s thing and invoke your callback(s) when updates are required.
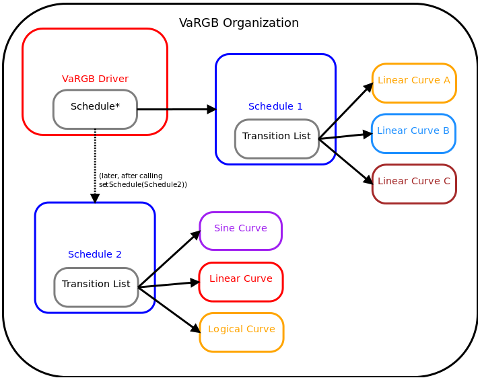
You start by creating all the curves you need, and add them to one or more schedules. Then you set a schedule as active in the VaRGB driver, and send it a tick() message every once in a while. See below for:
Transition Curves
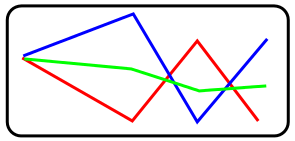
As mentioned in the VaRGB overview, the library comes with a number of built-in transition curves. Each curve either defines a particular behaviour or allows you to operate on an existing curve to modify its value or combine it with another. The basic/fundamental curves always have a duration parameter that specifies how long they should be active (in seconds).
I’ll present each curve type here, along with a bit of info on how you go about creating them.
Fundamental Curves
The basic curves may be used on their own, or as building blocks on which logical curves operate.
The Constant curve, obviously enough, sets the red, green and blue values immediately and keeps them there for the duration of the curve, as you’ve specified. It is constructed using:
Constant(RED, GREEN, BLUE, DURATION);
The Linear curve goes from the RGB values as they were when the curve came into effect all the way to the target RGB values you specify, gradually over the duration of the curve. It is created using:
Linear(TARGET_RED, TARGET_GREEN, TARGET_BLUE, DURATION);
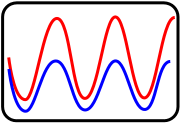
The values for red, green and blue vary according to a sine wave when using the Sine curve. The values will vary from 0 to whatever maximum value you’ve specified, starting at 1/2 of max by default (though you can modify this behaviour using the phase_degrees parameter). It’s constructor looks like:
     Sine(MAX_RED, MAX_GREEN, MAX_BLUE,
                   DURATION, SECONDS_PER_CYCLE [, PHASE_DEGREES]);
The SECONDS_PER_CYCLE parameter specifies how long it takes to go from 1/2 max, to max, down to zero and back up to 1/2 max (in seconds). If used, the PHASE_DEGREES should be a value between 0 and 359.
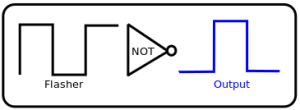
The Flasher alternates between two values (0 and target value, by default), with a 50% duty cycle. To create it, you call
      Flasher(TARGET_RED, TARGET_GREEN, TARGET_BLUE,
                           DURATION, NUMBER_OF_FLASHES);
The Flasher will alternate between the two states NUMBER_OF_FLASHES times within the DURATION. For circumstances where you want to alternate between two values, rather than between “off” and your RGB targets, you can use the object’s setBaseIllumination() method (see the API for details).
Logical Curves
With “logical” curves, you operate on one or two other curves. Using these you can manipulate and combine curves and, since you can initialize a logical curve with any of the curve types, you can do this to any depth to create many kinds of effects, e.g.
OR( Threshold(Sine()), OR(AND(Linear, Constant), Flasher()) );
or whatever you need. Logical curves don’t have a duration parameter, as their lifetime is tied to that of the curve(s) on which they operate. To keep things simple and light for use with microcontrollers, logical curves–and VaRGB in general–uses pointers to objects. There is no memory management or deep copying involved, so the objects pointed to are expected to be alive and around as long as they are in use by the schedule(s). The simplest thing is to just use global variables when working on a microcontroller like the Arduino.
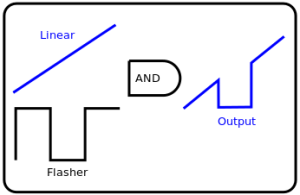
The AndLogic curve does a bit-wise AND operation on the corresponding channels (R, G and B) of two curves. This can be useful in a number of situations. You create an AND curve by passing pointers to two existing curves to its constructor:
AndLogic(PTR_TO_CURVE_A, PTR_TO_CURVE_B);
You get these pointers either by constructing curves A and B dynamically (using new) or simply by passing the address of the objects, e.g.
AndLogic my_and(&my_flasher_curve, &some_linear_curve);
One of the uses of AND curves is for bit masking, like in the LogicalSong example, where we only want the lower bits so we can left shift them to produce a sawtooth, e.g.
Linear my_lin(255, 0, 0, 30); // go to red == 255 in 30 seconds
Constant my_mask(15, 0, 0, 30); // 15 == 0b00001111 so we use it as a mask:
AndLogic masked_lin(&my_lin, &my_mask); // the result goes from 0 to 15 on red, repeatedly
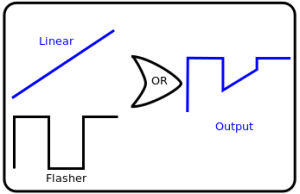
The OrLogic is the union version of AndLogic, it simply does a bit-wise OR on the respective red, green and blue channels of two curves. Like the AND, it is created by passing it pointers to two curves:
OrLogic(PTR_TO_CURVE_A, PTR_TO_CURVE_B);
Any bit that is set to 1 in either curve, for red, green and blue, will be passed in the resulting output. LogicalOr is therefore ideal for use when creating a curve for each RGB channel, to combine the results into a single output, e.g.
     // say we have some_red, some_green and some_blue curves, created to
     // do special stuff on each channel, now:

     OrLogic red_with_green(&some_red, &some_green);

     // all together now:
     OrLogic all_colors(&red_with_green, &some_blue); // yay
The Not curve does a bit-wise NOT on the child curve–by default on all channels, but this is configurable. You can use the NOT to invert one or more of the R-G-B channels. It is created with:
     Not(PTR_TO_CURVE); // invert all
     // or you can specify which channels to operate on
     Not(PTR_TO_CURVE, ON_RED, ON_GREEN, ON_BLUE);

     // e.g. to invert only green
     Not(&some_curve, false, true, false);
The Threshold curve is used to specify a lower- or upper-bound for the output. If the child curve meets the requirement, it will be passed through unchanged, otherwise the default value will be returned. The Threshold constructor is:
Threshold(PTR_TO_CURVE, THRESHOLD_VALUE, THRESHOLD_DIRECTION [, DEFAULT_VALUE]);
The THRESHOLD_VALUE (a positive integer) is the value each channel will be compared with. The THRESHOLD_DIRECTION must be one of:
- vargb:: Curve::ThresholdAbove (child must be above THRESHOLD_VALUE to pass through)
- vargb::Curve::ThresholdBelow (child must be below to pass)
The Threshold is applied to a Sine curve, in the LogicalSong example, to create a “throbber” which holds at 1/2 of maximum until the sine wave values surpass the threshold value.
Shift Curve
Yeah, I was too lazy to try and represent a Shift curve graphically… The Shift curve will shift the value of each channel left or right. This is used in the LogicalSong example to create a large sawtooth, by bit-masking a linear curve and then left-shifting the result. Shif is created with:
Shift(PTR_TO_CURVE, NUM_BITS, DIRECTION);
The NUM_BITS parameter is the number of positions to shift and the DIRECTION indicates whether this is a left- or right-shift. DIRECTION must be one of:
- vargb::Curve::ShiftLeft or
- vargb::Curve::ShiftRight
Programming with VaRGB
The examples included with the library go into detail, but here we’ll go over everything you need to get started. You need a few things to get going with VaRGB, namely
- A good idea of how you want your RGB illumination to behave, and some Curve objects to make it so;
- A callback function of the correct type, so your code can talk to the hardware when the Red/Green/Blue values should be updated;
- At least one Schedule, which is an ordered list of transition curves that will run one after the other;
- A VaRGB driver object, which you’ll tick() periodically, so it can figure out whether it’s time to invoke that callback of yours.
Creating the curves is touched upon above, so to keep things simple any curves referred to in the following are assumed to have been created appropriately beforehand.
Callback functions
VaRGB is infinitely flexible in terms of RGB hardware because it basically ignores the problem and leaves the communication with the lighting completely up to you. For this to work, you must define a function of the appropriate type for use as a callback. You can choose the simpler version in most cases:
void MyColorSettingCallback (vargb::ColorSettings * color_values) {
    /* Here, you need to talk to your RGB hardware to set red,
       green and blue to whatever is specified in:
       color_values->red, color_values->green and
       color_values->blue.

       If you're using, say, MegaBrites with the TinyBrite library
       you could do:
     */

      the_brite.sendColor(color_values->red, color_values->green,
                          color_values->blue);

}
The callback will be invoked whenever the values for red, green and/or blue need to be modified. The second possibility is to use a callback that takes the currently running Schedule as a parameter, for use when you’re doing something fancier:
void AMoreComplexCallback(vargb::Schedule* the_schedule,
                          vargb::ColorSettings * color_values) {
     /* Same as above, just use color_values->red, color_values->green,
       color_values->blue and the Schedule pointer however you need
     */
}
The process is the same as above for accessing and setting the color values, but you also get a pointer to the Schedule object so you can query it’s ID or whatever.
VaRGB Driver
Once you have your callback defined, you create the VaRGB driver object by handing it the name of the function to use when updating the colors.
vargb::VaRGB vargb_driver(MyColorSettingCallback);
Transition Schedules
The Schedule is little more than a list of curves, which will be run in the sequence with which they were added.
Create the Schedule object, then add all the curves you want to include (by passing a pointer to a Curve object), in order:
vargb::Schedule my_schedule;
my_schedule.addTransition(&some_linear_curve);
my_schedule.addTransition(&another_cool_curve);
// ...
my_schedule.addTransition(a_pointer_to_the_final_curve);
You can create multiple schedules, to swap them in and out of the driver whenever appropriate. When you’re ready, set the active schedule in the driver by passing a pointer to it to setSchedule():
my_driver.setSchedule(&my_schedule);
Passage of Time
From this point on, all VaRGB needs is to be informed when time has passed so it can decide whether any of the R-G-B values need to be updated. This is done with the driver’s tick() method, which must be called in a timely fashion every vargb::VaRGB::tickDelayTimeMs() milliseconds.
If your code is doing nothing else, you can simply delay for the appropriate amount of time between every tick. For an Arduino, this would happen in the loop() function like so:
void loop() {

    // tell VaRGB that time has passed
    my_driver.tick();

    // wait an appropriate amount of time:
    delay(my_driver.tickDelayTimeMs());

}
In many cases, your code will be doing other interesting things. That’s fine, as long as you don’t block for too long or mess up VaRGB’s timing by calling tick() with too little or too long a delay. Assuming none of your operations take more than tickDelayTimeMs() (around 20 milliseconds or so), the following approach works well (again shown in an Arduino’s loop function):
void loop() {

     unsigned long time_spent_putzing_around_ms = 0;

     // make note of current time:
     unsigned long start_time = millis();

     // tell VaRGB that time has passed
     my_driver.tick();

     // do other mondo-cool things
     // ... take a few millis

     // figure out if we spent any measurable time doing stuff...
     unsigned long end_time = millis();

     if (end_time > start_time)
     {
          time_spent_putzing_around_ms = end_time - start_time;
     }

     // delay appropriate amount of time (or try to catch up!)
     if (time_spent_putzing_around_ms < my_driver.tickDelayTimeMs())
     {
         delay(my_driver.tickDelayTimeMs() - time_spent_putzing_around_ms);
     }
}
And that’s it! With this info in hand, and a little review of the various included examples, you should be able to get VaRGB working in your own projects.
Project Pages:
VaRGB Overview
[siblings]

