Just got my hands on RedBear Lab‘s Duo—what promises to be a great little BLE/WiFi combo—and got some preliminary testing done. By the end of the seven straightforward steps detailed here, you’ll know all the basics about the Duo and have your own “Arduino” code running on the device, too. Other than my own ramblings, all the information here is available through the various RedBear resources, but they’re all over the place so I’ve collected everything you need in one spot and ordered it as a simple sequence.
You’ve got Mail
When I’ve forgotten all about a particular crowd-sourced project I backed months ago and I go through my little stack of deliveries only to find a neat new device begging me to start exploring, I feel like a 6 year old at a surprise birthday party: yay!
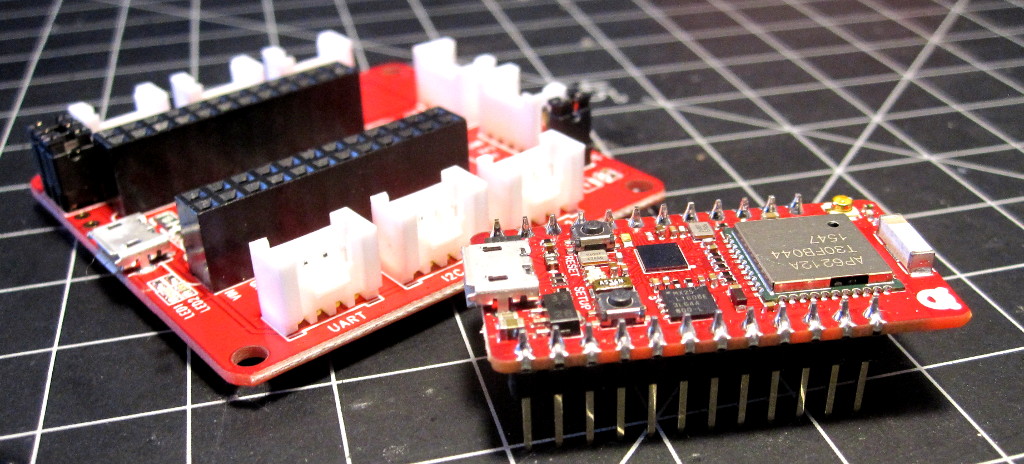
And so it was yesterday, when I got an envelope from Singapore bearing a shiny new RedBear Duo along with an RBLink board. I got down to the business of play as soon as I could. Here are the first results.
The Duo
 The Duo is a sweet device just teeming with possibilities. In essence, it’s a combination of
- A powerful microcontroller;
- WiFi; and
- Bluetooth v4
in a form factor that’s easy to breadboard or integrate into other circuits.
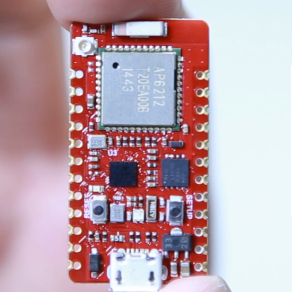
The microcontroller is an STM32F205, which runs at 120MHz (wait a minute, that’s faster than my first PC!), 128k of RAM, has a bunch of 12-bit DACs, a crypto/hash processor and more.
The comm is all handled by an AP6212A. The bluetooth side is Bluetooth 4.1 dual mode, so it handles both bluetooth low energy and “classic” (transmitting at up to 9dBm and sensitive down to -86dBm).
The WiFi is restricted to the 2.4GHz band (which allows for use of a single on-board antenna, or an external UFL connected antenna), but covers 802.11b/g/n, transmitting at somewhere around 14-16 dBm.
There’s even an FM radio hidden in there, and you can use everything simultaneously.
If you know the Particle Photon the duo will be quite familiar as it’s basically a superset of the device, using the same form factor and pin-out. It also supports Particle’s Cloud and WebIDE.
The main differences are in the WiFi+Bluetooth combination (hence the name duo I guess) and the fact that it has more flash, combining the STM’s built-in Meg with an additional external 2 Megabytes (thanks to a Macronix MX25L1606EZUI-12G ).
Storage Space: the straight dope
The 3 Meg of storage can be a bit misleading. The truth is that much of this space is taken up by the instructions required to provide all the cool functions: communications, OTA, factory reset and the APIs. As a developer, here’s what you really get thanks to the combination of STM and external flash:
- 80K of “EEPROM”: this is non-volatile storage right on the microcontroller;
- 256K of user space: flash, also on-board, for your executable firmware;
- And… that’s it!?
Actually, the external flash has a whole megabyte marked as “reserved” which is currently unused. Either (at least) part of this will be made available by RedBear or someone (maybe even me) will hack the firmware to make it so.
Duo Quick Start Guide
Go from un-boxing the device to running some code, in 7 steps.
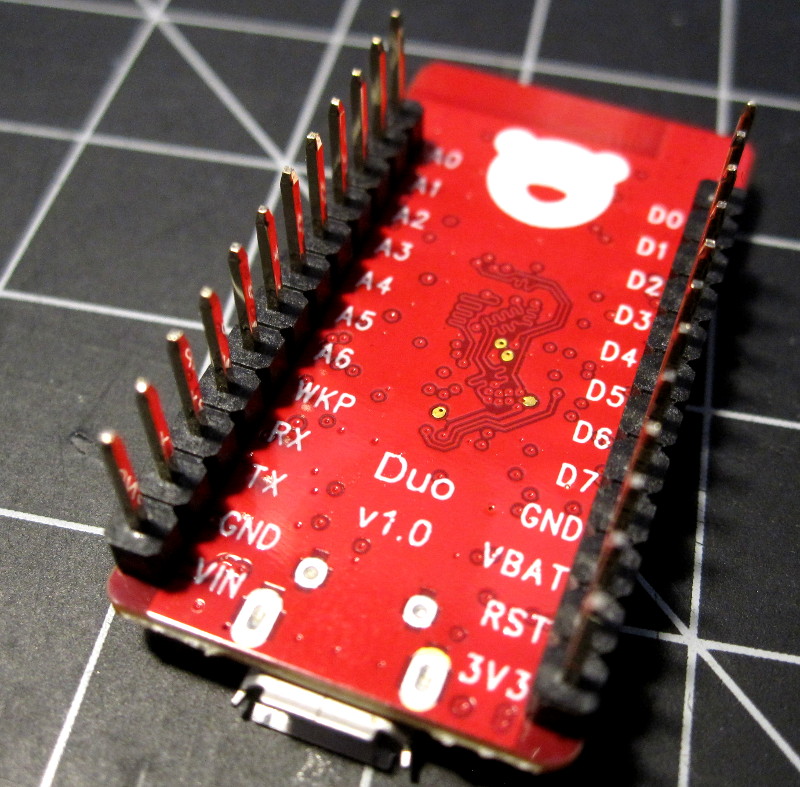
Step 1: It’s alive
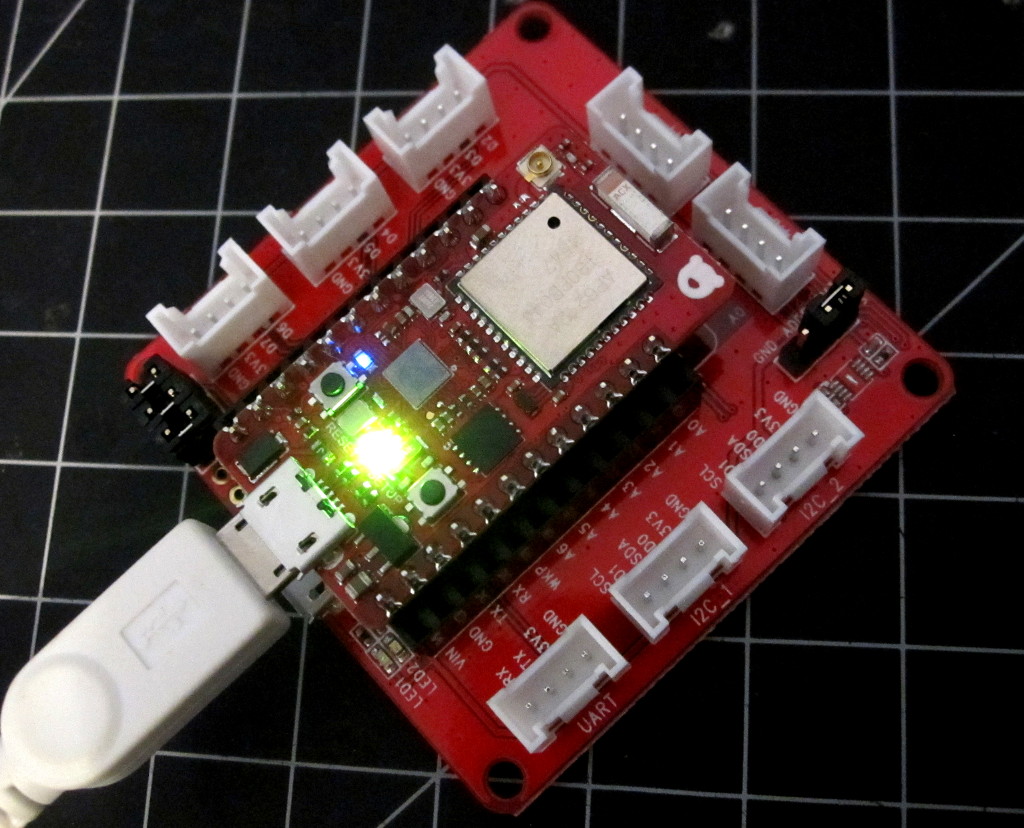
The first test is simple as pie. Plug in usb cable: computer powers Duo, duo opens comm port to computer (shows up as /dev/ttyACM* under Linux). Huzzah, blinkenlights!
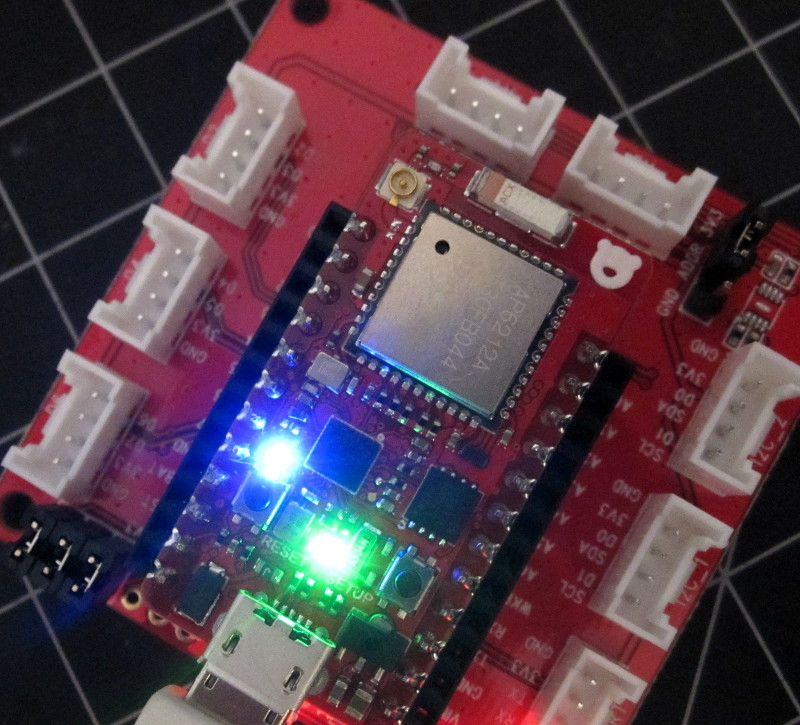
The system LED produces light patterns, so we know the device survived shipping and is alive.
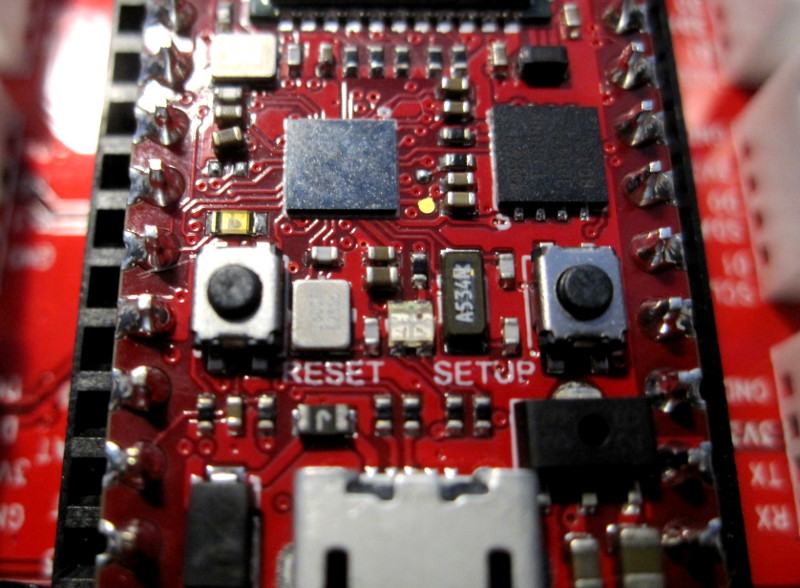
Feedbackenstein
Owing to the small form factor, and to its Photon heritage, the most immediate form of feedback you get from the Duo is through its system LED. This is an RGB indication LED that flashes and pulses on the center of the board, between the two buttons.

It’s a good way to know the device is powered and working, and an OK way to get a quick idea of the state it’s in.
As long as you aren’t color blind, there’s a good deal of information that can be transmitted using combinations of color and behaviour. In fact, there’s really a little too much info being conveyed by that diode.
 There are 10 (yes, 10) ways the system LED lets you know what’s going on (connected, OTA, listening, etc. etc.). Then there’s the error mode, where it will actually blink an S.O.S. followed with between 1-12 flashes (depending on the nature of the error) and terminated with another SOS sequence.
So more than 20 states expressed with that LED… Useful? Perhaps. Human-centered design? Not so much.
I get it. In fact I actually designed two circuits with a similar (though hopefully saner) blinky-feedback PCBs in recent months. Still, for any system I actually put in the hands of clients, I’ll probably be finding a way to disable all those notifications, as they’d only be a support nightmare (“the LED is … what?”, “is it cyan, or navy blue? Flashing or breathing?”, “is it the blue LED or the RGB LED, set to blue?”) and it will eat up power.
Still, we’re going to need to use that LED to get started so I guess I’m glad it’s there.
Step 2: Checking function and firmware version (optional)
You’re probably going to need to update the firmware that was shipped on the device. If you want to see that it’s operational, and verify the currently installed firmware version, this optional step lets you query the device using the factory-set firmware currently running.
To do so, hookup the Duo to your computer via USB and wait for it to flash blue (listening). Mine actually went straight to flashing green, but some twiddling with the SETUP/RESET buttons got it to boot into listening mode.
OSX and Linux users need only start-up the “screen” command passing the TTY as an argument, e.g.
$ screen /dev/ttyACM0
or, for Mac:
$ screen /dev/tty.usbmodemXXXX
Pressing ‘v’ will reveal the firmware version, ‘i’ the Device ID, and ‘s’ seems to output some JSON I didn’t take the time to figure out.
Note that getting out of screen once it’s running in a terminal isn’t superduper intuitive. On Linux, at least, you can do
CTRL-A
 # then type in
:quit
 # and hit enter. oof
Windows users can do the same test with Putty, by following these directions.
Note that this step was a bit of a hit-and-miss affair, for me. Sometimes it worked fine, sometimes not so much. Having issues? Quit and re-launch screen, reset the Duo and try again, and that kind of putzing… I got it working a few times, and the firmware I received was 0.2.0.
Step 3: Update the Firmware
The Duo firmware is in very active development, right now. Between the time when I played with the device, last night, and the time of this writing version 0.2.3 seems to have come out of beta. Maybe… it’s all a bit confusing.
Versions
The firmware at https://github.com/redbear/STM32-Arduino/tree/master/firmware/v0.2.3 in the STM32-Arduino repository (tagline “Use Arduino IDE to develop STM32 MCU (e.g. RedBear Duo) firmware”) is was updated a few hours ago.
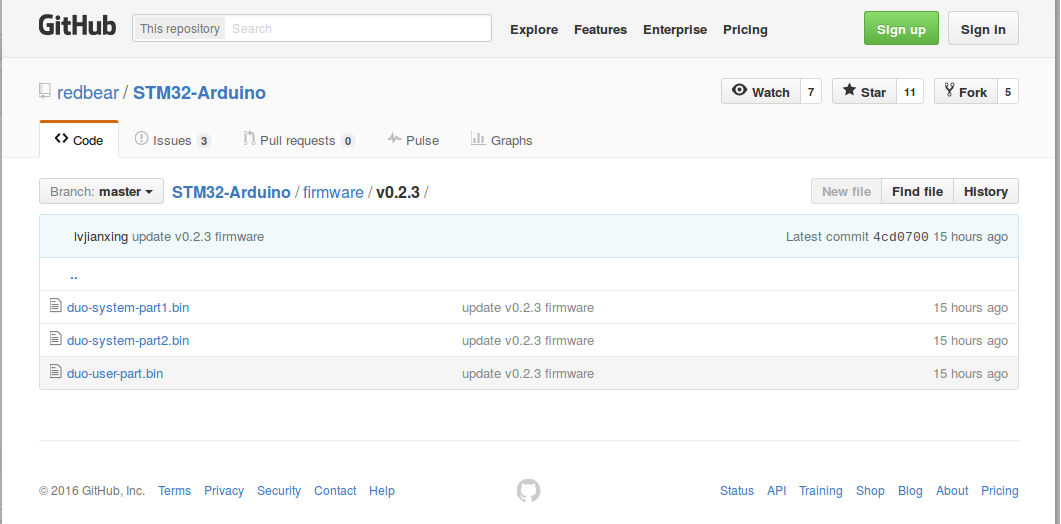
But the firmware at https://github.com/redbear/Duo/tree/master/firmware in the Duo repository (tagline “Resources for the Duo”) was only updated 5 days ago and is still v0.2.3-rc.2.

I’ve used both, with mixed results.
Starting with the firmware from 0.2.2 from the Duo repository, I updated and ran all my tests. Everything went smashingly, there. Today, I updated using the STM32-Arduino repo‘s duo-system parts, and the test code I’d loaded yesterday still ran perfectly. I recompiled and re-installed the WiFi ScanNetworks example and it still worked on 0.2.3, but the BLE Scan example—SOS of death, a hard fault killed it good. My guess is that they’ve changed the BLE stack and my Arduino SDK install is still compiling against the old stuff. I’ve since reverted back to 0.2.2.
So my advice is to stick with the official files from https://github.com/redbear/Duo/tree/master/firmware and only use the beta stuff there when you’re sure you know what it implies.
All this to say that it’s pretty unlikely the device you have on hand is the latest and greatest in terms of firmware, so we need to update. For this, you need:
- The various duo-*.bin files from an up-to-date subdirectory (there are zip files in each sub-directory to get them all at once); and
- A DFU uploader program
DFU-Util
Under Ubuntu, installing the DFU uploader is as simple as
sudo apt-get install dfu-util
For Mac, you can use Homebrew to install the program. For Windows, for some reason you always need to mess around with USB drivers and stuff… Follow these directions.
I did my tests under Linux, so that’s what I’ll describe, but once dfu-util is installed it should be pretty similar.
Linux note: as usual, getting the tty to have the correct permissions with udev rules is the rite of passage when you get a new USB thingy and you don’t want to be issue sudo commands all day long. This is useful, down the road, but didn’t change anything for this step because the DFU commands are transmitted straight through USB and don’t deal with the TTYs anyway. Might be a way around this, I dunno.
Flashing
 Once dfu-util is installed, hook-up the Duo. The light does blinky stuff and settles on some color. It was supposed to be blue flashes (listening), but for me was actually green flashing, which seemed to indicate that it was attempting to connect to wifi, as if someone had set an SSID/password prior to shipping the device. Anyhow, now we go into DFU mode.
Press, and hold, the tiny SETUP button (on the right). Nothing will happen, and that’s ok.
While still holding SETUP, tap (meaning press for a second, and release) the RESET button (on the left). Keep holding SETUP.
The system LED goes off, starts flashing purplish. Keep holding SETUP.
The light starts flashing “yellow”. Maybe it’s my eyes, or my device, but my “yellow” is hella green. Mk. So this is yellow and it’s in DFU mode. Let go of SETUP before it changes color.
Now it’s time to burn the flash. This has to be split up in multiple steps owing to the way memory is segmented (examples here are for Linux, likely quite similar for others):
# update the system firmware
sudo dfu-util -d 2b04:d058 -a 0 -s 0x08020000 -D duo-system-part1.bin
sudo dfu-util -d 2b04:d058 -a 0 -s 0x08040000 -D duo-system-part2.bin
# update the factory reset image
sudo dfu-util -d 2b04:d058 -a 2 -s 0x140000 -D duo-fac-tinker.bin
# update user firmware (“your” code)
sudo dfu-util -d 2b04:d058 -a 0 -s 0x080C0000 -D duo-user-part.bin

And we’re done.
If you see error messages about “Invalid DFU suffix”, don’t worry about it (for now, anyway). If you’re getting “No DFU capable USB device available”, that’s more problematic. Check that we’re really in DFU mode (flashing yellow, as describe above). If you’re under Linux, check that a device 2b04:d058 is showing up in the list from lsusb. Also, dmesg should produce output with lines like:
[98846.826182] usb 6-1: Product: Duo DFU Mode
[98846.826187] usb 6-1: Manufacturer: RedBear
If you’re seeing
[98518.268314] usb 6-1: Product: Duo with WiFi and BLE
[98518.268320] usb 6-1: Manufacturer: RedBear
instead, and a ttyACM* appears, you’re not entering DFU.
Exit DFU mode
To get out of DFU mode, just click the RESET button and things will happen with the system LED, then the device will appear as a comm port on your computer (e.g. /dev/ttyACM0).
Note: it takes a few seconds, longer than I’d expect, for the comm port to become available. Before that, you may see it but it is “busy”.
Step 4: Arduino for Duo Setup (Arduono?)
There must be 5 different ways to create firmware for this device and a handful of methods for uploading it, another source of confusion. The easiest is surely to go the Arduino route.
Using a recent (1.6.7 or better) version of the Arduino IDE, you can get everything you need to build programs for the Duo without too much hassle.
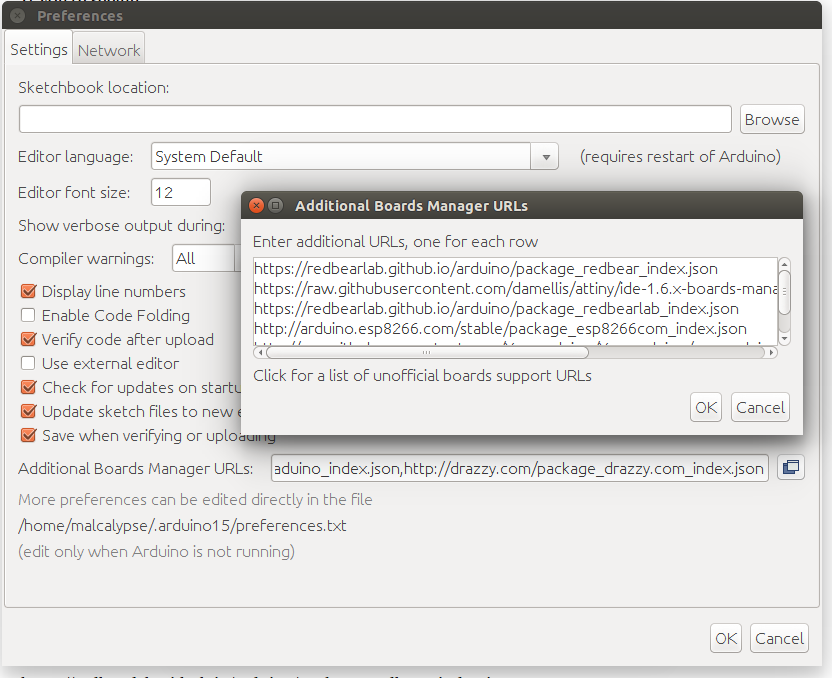
Launch the Arduino IDE, and go to
File → Preferences
Add the following URL to the “Additional Board Manager URLs” list (clicking on the icon to the right of the field is the simplest way to do this if you already have entries in there):
https://redbearlab.github.io/arduino/package_redbear_index.json
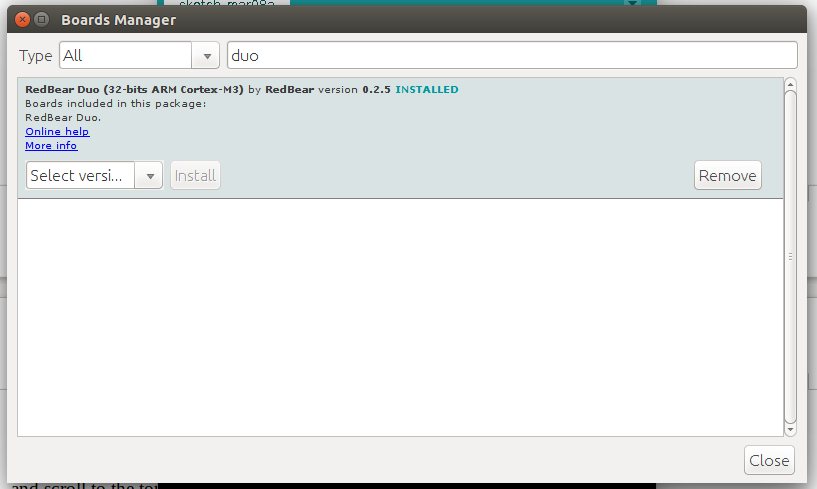
When that’s done, head to
Tools → Board
and scroll to the top to get to the Boards Manager.
Entering “duo” in the filter field should be all you need to find and install the Duo SDK. Version 0.2.5 (the latest at the time of this writing) seems to work fine with the 0.2.2 firmware.
Step 5: Build a program
Time to crunch some code!
Select the newly installed “RedBear Duo” board in
Tools → Board
Now pick a program from
File → Examples → RedBeard_Duo
I started with the BLE scan (RSSI values are crazy, but it works as long as you have some BLE device advertising nearby), then tried the WiFi scan (works perfectly) and then the WiFi webserver (controls the pretty user LED)… they all went smoothly, so take your pick.
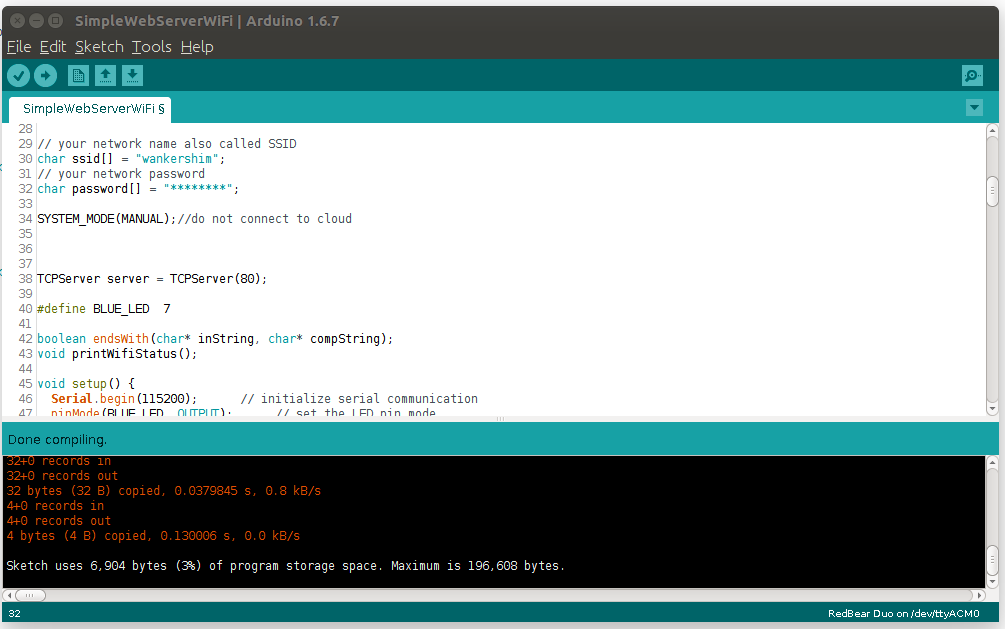
With the program loaded, hit Verify to compile. When I compile the WiFi network scan, I end up with: Sketch uses 3,048 bytes (1%) of program storage space. Maximum is 196,608 bytes.
I’m not certain why the maximum is stated as 192K but that’ll be plenty for now. So… No errors? Excellent!
Step 6a: upload your firmware, works-maybe
Next, you can try the intuitive this-should-work way by selecting “Duo FW Uploader” as the programmer, and the correct port, and then hit “Upload”.
The IDE will (stupidly) compile everything again and attempt an upload. However, this has never worked for me.
I’ll either get
avrdude: ser_open(): can't open device "/dev/ttyACM0": Device or resource busy
or maybe
avrdude: ser_recv(): programmer is not responding
The system LED on the Duo react to the attempt, but sometimes it goes light blue, sometimes more purply, and it gets stuck there… Maybe I need to put it into some mode, or maybe I need to talk directly to the UART or…
Whatever, I don’t actually care. We’ve already uploaded user firmware to the device, back in step 3, so we know of at least one way to do it that actually works.
Step 6b: upload your firmware, works-fer-sure
Though it’s a bit of a pain to do this manually, and annoying to have to put the Duo into/out of DFU mode, we know DFU burns work so we can just use that.
In the Arduino IDE, you can do
Sketch → Export Compiled Binary
It may force you to save the example to another (writeable) ino, if you used one of the library examples. Once that export is done, you can do
Sketch → Show Sketch Folder
to see the contents of the directory. I’d saved the WiFi scanner example as “Duo_Scan” so the directory contains:
Duo_Scan.ino Duo_Scan.ino.bin
The .ino (sketch) and, now, a .bin file. That’s what we need.
Issuing the old user firmware DFU upload command, with our own bin this time, is all you need:
sudo dfu-util -d 2b04:d058 -a 0 -s 0x080C0000 -D /path/to/Duo_Scan.ino.bin
For Linux users: I hate all the steps involved in exporting the executable, so I just find the temporary directory where the IDE compiled the program (e.g. /tmp/build12345ACBC.tmp/) and have a look at what was produced. Sorting by creation time, this will look something like
ScanNetworks.ino.bin.hex
ScanNetworks.ino.bin
ScanNetworks.ino.bin.no_crc
ScanNetworks.ino.bin.crc_block
ScanNetworks.ino.elf
ScanNetworks.ino.map
libcore.a
and the .bin file is already right there, ready to go. Use the one that ends in .bin, with no extra suffix, for direct DFU uploads.
Step 7: try it out!
First thing is to get out of DFU mode. Hit RESET and let it boot, then give it a little time to setup the TTY.
How you test your upload will depend on the program you compiled, of course.
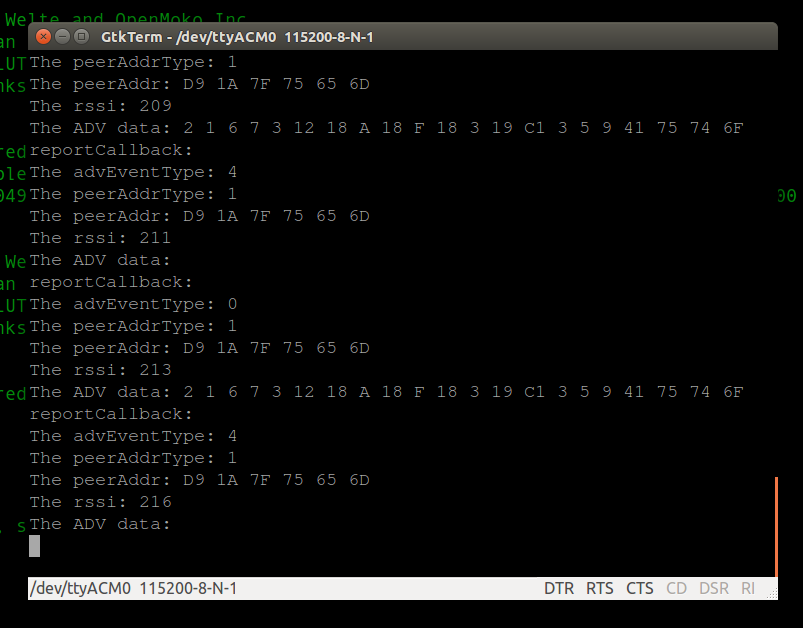
BLE test
Most of the examples involve either connecting to the USB-serial, connecting to the Duo over the airwaves, or both.
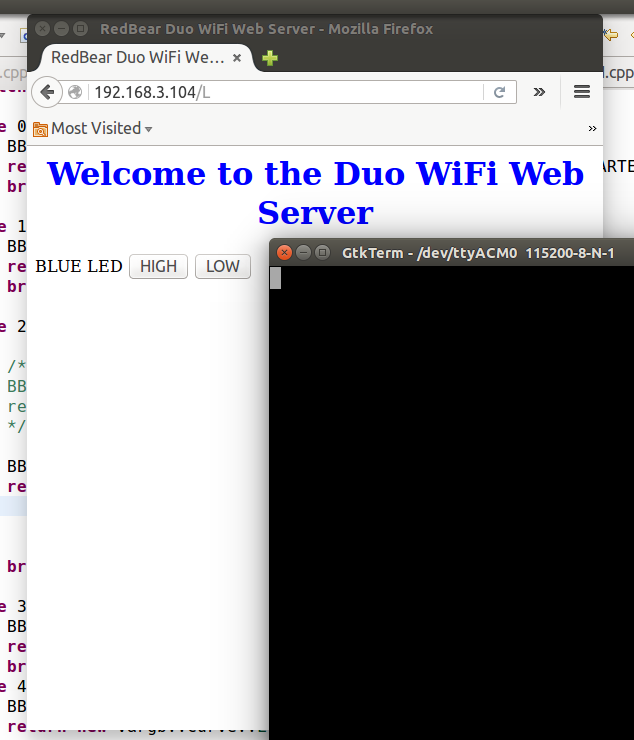
Web Server test
Duo + RBLink, webserver Test
Check the setup() function in the sketch, there’s probably a
Serial.begin(115200);
which is a pretty good clue as to what to do.
Wrap-up
So that’s it for my initial test run and the resulting quick start guide. There’s still a whole lot left to explore, but with the info above we should be all set to create programs and get them running on the Duo.
Things I’ll be looking into next include OTA (is it just for Particle web stuff, or is it usable otherwise?), RBLink (both programming the Duo when seated in the RBLink and, more interestingly, debugging Duo programs using the JTAG/STLINK stuff) and of course the various APIs for the Wifi and BLE.
I hope the guide was useful to you and that you’ll share some of the awesome things you create using it.
Cheers!